Suppose you’re building a remote control library. You have basic remotes and advanced remotes. You have TVs, radios, and smart speakers. Without a plan, you end up writing: BasicTVRemote, BasicRadioRemote, BasicSpeakerRemote, AdvancedTVRemote, AdvancedRadioRemote, AdvancedSpeakerRemote. Six classes to cover 2 remotes × 3 devices. Add a Blu-ray player and you need two more. Add a “gaming remote” and you need three more. The class count grows as M × N — and every class mixes remote logic with device logic into a tangled lump.
The Bridge pattern breaks this M×N explosion into M+N. You define the remote control hierarchy independently, you define the device hierarchy independently, and you connect them with a single reference — the bridge. Adding a new device means one class. Adding a new remote means one class. Neither side knows the other’s internal details.
All code compiles and runs with Java 25. No external dependencies required.
The Core Insight: Two Independent Hierarchies
Before writing any code, it’s worth understanding why the pattern exists. The GoF formulation is: decouple an abstraction from its implementation so that the two can vary independently. That sentence uses “abstraction” and “implementation” in a specific way that doesn’t mean what you might expect.
In the Bridge vocabulary: the Abstraction is the higher-level control layer — the thing clients interact with (the remote control). The Implementation is the lower-level work layer — the thing that does the actual work (the device). The point is not that one is an interface and the other is a class. The point is that you want two separate inheritance hierarchies that can grow independently, connected only through a stable interface.
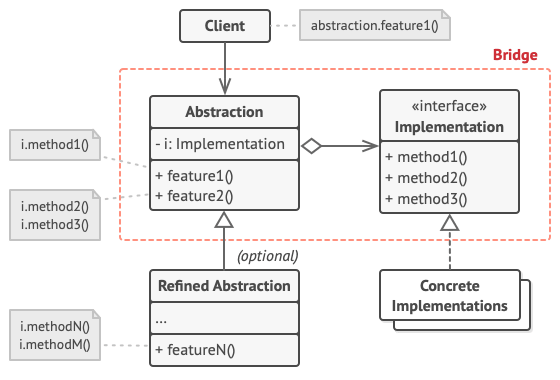
The Four Participants
- Abstraction — the high-level interface. Holds a reference to an Implementor. Delegates real work through it. In our example:
RemoteControl. - Refined Abstraction — extends Abstraction with additional features. In our example:
AdvancedRemote. - Implementor — the interface that defines the low-level operations. In our example:
Device. - Concrete Implementor — actual implementations of the low-level interface. In our example:
TVandRadio.
Step 1 — The Implementor Interface
This is the stable interface that all devices must satisfy. The remote controls only know this interface — they never reference TV or Radio directly. This is the bridge.
Device.java
package bridge;
/**
 * Implementor — the "implementation" side of the bridge.
 * All devices (TV, Radio, SmartSpeaker, etc.) implement this.
 * The remote controls only know about this interface, never about specific devices.
 */
public interface Device {
    boolean isEnabled();
    void enable();
    void disable();
    int getVolume();
    void setVolume(int percent);
    int getChannel();
    void setChannel(int channel);
    String getName();
}
Notice that the Device interface defines capabilities at the level of hardware operations — power, volume, channel. Remote controls work in terms of user actions like “toggle power” or “volume up.” That mapping — from user intent to hardware operation — is where the abstraction layer lives.
Step 2 — Concrete Implementors (TV and Radio)
Each device has completely different internal logic — different state, different hardware behaviour — but they all satisfy the same Device contract. Importantly, neither class knows anything about remote controls.
TV.java
package bridge;
// Concrete Implementor #1: Television
public class TV implements Device {
    private boolean on = false;
    private int volume = 30;
    private int channel = 1;
    @Override public boolean isEnabled() { return on; }
    @Override public void enable()  { on = true;  System.out.println("  [TV] Powered ON");  }
    @Override public void disable() { on = false; System.out.println("  [TV] Powered OFF"); }
    @Override public int  getVolume() { return volume; }
    @Override public void setVolume(int percent) {
        this.volume = Math.max(0, Math.min(100, percent));
        System.out.println("  [TV] Volume set to " + this.volume);
    }
    @Override public int    getChannel()       { return channel; }
    @Override public void   setChannel(int ch) { this.channel = ch; System.out.println("  [TV] Channel -> " + ch); }
    @Override public String getName()          { return "Samsung TV"; }
}
Radio.java
package bridge;
// Concrete Implementor #2: Radio
public class Radio implements Device {
    private boolean on = false;
    private int volume = 20;
    private int channel = 1;
    @Override public boolean isEnabled() { return on; }
    @Override public void enable()  { on = true;  System.out.println("  [Radio] Powered ON");  }
    @Override public void disable() { on = false; System.out.println("  [Radio] Powered OFF"); }
    @Override public int  getVolume() { return volume; }
    @Override public void setVolume(int percent) {
        this.volume = Math.max(0, Math.min(100, percent));
        System.out.println("  [Radio] Volume set to " + this.volume);
    }
    @Override public int    getChannel()       { return channel; }
    @Override public void   setChannel(int ch) { this.channel = ch; System.out.println("  [Radio] Frequency -> " + ch); }
    @Override public String getName()          { return "JBL Radio"; }
}
Step 3 — The Abstraction (RemoteControl)
The remote holds a Device reference — the bridge. Its methods express user-level actions (toggle power, volume up) and translate them into device-level operations (enable/disable, setVolume). The word protected on the field is deliberate: it lets AdvancedRemote access the device to add more translations.
RemoteControl.java
package bridge;
/**
 * Abstraction — the remote control.
 *
 * Key point: RemoteControl holds a Device (the bridge) and delegates
 * all actual work to it. It adds higher-level semantics on top:
 * "togglePower" instead of separate enable()/disable() calls.
 */
public class RemoteControl {
    protected Device device;  // THE BRIDGE
    public RemoteControl(Device device) {
        this.device = device;
        System.out.println("Remote paired with: " + device.getName());
    }
    // User action → device operation translation
    public void togglePower() {
        if (device.isEnabled()) {
            device.disable();
        } else {
            device.enable();
        }
    }
    public void volumeUp()   { device.setVolume(device.getVolume() + 10); }
    public void volumeDown() { device.setVolume(device.getVolume() - 10); }
    public void channelUp()   { device.setChannel(device.getChannel() + 1); }
    public void channelDown() { device.setChannel(device.getChannel() - 1); }
}
Step 4 — Refined Abstraction (AdvancedRemote)
The advanced remote extends the basic one without touching the device hierarchy at all. It adds mute() and jumpToChannel() — both implemented entirely in terms of the same Device interface. Add this one class and every existing device immediately gains these capabilities.
AdvancedRemote.java
package bridge;
/**
 * Refined Abstraction — extends RemoteControl with additional capabilities.
 *
 * The device hierarchy doesn't change at all. TV and Radio
 * automatically support mute() and jumpToChannel() because they
 * implement Device. Zero new code on the implementation side.
 */
public class AdvancedRemote extends RemoteControl {
    public AdvancedRemote(Device device) {
        super(device);
    }
    public void mute() {
        System.out.println("  Muting " + device.getName());
        device.setVolume(0);
    }
    public void jumpToChannel(int channel) {
        System.out.println("  Jumping to channel " + channel);
        device.setChannel(channel);
    }
}
💡 Why protected on the device field? If the field were private, subclasses like AdvancedRemote couldn’t access the device at all — they’d have to call through the parent’s methods or add a getter. Making it protected is a deliberate design choice in the Bridge pattern: the abstraction hierarchy shares the bridge, because all refined abstractions need to call implementor methods. This is different from normal encapsulation advice; it’s intentional coupling within one side of the bridge.
Wiring It Together: Main Demo
Main.java
package bridge;
public class Main {
    public static void main(String[] args) {
        System.out.println("=== Bridge Design Pattern Demo ===\n");
        // Combination 1: Basic Remote + TV
        System.out.println("-- Basic Remote controlling TV --");
        RemoteControl remote1 = new RemoteControl(new TV());
        remote1.togglePower();
        remote1.volumeUp();
        remote1.channelUp();
        System.out.println();
        // Combination 2: Advanced Remote + Radio
        System.out.println("-- Advanced Remote controlling Radio --");
        AdvancedRemote remote2 = new AdvancedRemote(new Radio());
        remote2.togglePower();
        remote2.volumeUp();
        remote2.mute();
        remote2.jumpToChannel(91);
        System.out.println();
        // Combination 3: Advanced Remote + TV (no new classes needed!)
        System.out.println("-- Advanced Remote controlling TV --");
        AdvancedRemote remote3 = new AdvancedRemote(new TV());
        remote3.togglePower();
        remote3.jumpToChannel(5);
        remote3.mute();
        System.out.println("\n=== Demo complete ===");
        System.out.println("3 different remote+device combinations, 0 new classes needed.");
    }
}
Three different combinations from two remotes and two devices. No additional classes. If you now add a SmartSpeaker device, it immediately works with both remotes. If you add a VoiceRemote, it immediately controls all devices.
Console Output
— Basic Remote controlling TV —
Remote paired with: Samsung TV
[TV] Powered ON
[TV] Volume set to 40
[TV] Channel -> 2
— Advanced Remote controlling Radio —
Remote paired with: JBL Radio
[Radio] Powered ON
[Radio] Volume set to 30
Muting JBL Radio
[Radio] Volume set to 0
Jumping to channel 91
[Radio] Frequency -> 91
— Advanced Remote controlling TV —
Remote paired with: Samsung TV
[TV] Powered ON
Jumping to channel 5
[TV] Channel -> 5
Muting Samsung TV
[TV] Volume set to 0
=== Demo complete ===
3 different remote+device combinations, 0 new classes needed.
The Class Explosion Problem — Visualised
To make the benefit concrete: without Bridge, a hypothetical app with 4 remote types and 5 device types needs 20 classes. With Bridge it needs 4 + 5 = 9 classes — less than half, each with a single responsibility. The math gets more dramatic as the counts grow.
// WITHOUT Bridge: 4 remotes × 5 devices = 20 classes
// BasicTVRemote, BasicRadioRemote, BasicSpeakerRemote, BasicBluRayRemote, BasicProjectorRemote
// AdvancedTVRemote, AdvancedRadioRemote ...
// VoiceTVRemote, VoiceRadioRemote ...
// GamingTVRemote, GamingRadioRemote ...
// WITH Bridge: 4 + 5 = 9 classes
// RemoteControl, AdvancedRemote, VoiceRemote, GamingRemote   (4 abstractions)
// TV, Radio, Speaker, BluRay, Projector                      (5 implementors)
// Any combination works automatically.
This block is illustrative pseudocode contrasting class counts — it is not part of this repository’s runnable example.
Bridge in the JDK: JDBC and SLF4J
The JDK’s most famous Bridge implementation is JDBC. Your application code calls Connection, Statement, and ResultSet — these are the Abstraction. The actual database-specific logic lives in JDBC drivers (MySQL Connector, PostgreSQL JDBC, Oracle JDBC) — these are the Implementors. DriverManager wires them together at runtime. You can switch from MySQL to PostgreSQL by changing one line; the rest of your application doesn’t change.
// JDBC: your code uses only java.sql.* (the Abstraction/Target)
Connection conn = DriverManager.getConnection("jdbc:postgresql://localhost/mydb", user, pass);
Statement stmt = conn.createStatement();
ResultSet rs = stmt.executeQuery("SELECT * FROM users");
// Switch to MySQL: change the JDBC URL, keep the rest
// This is Bridge: your code is Abstraction, the driver is Implementor
This snippet is illustrative only — it shows where the Bridge pattern appears in the JDK, but it is not part of this repository’s runnable example.
SLF4J follows the same structure. Logger and LoggerFactory are the Abstraction. Log4j, Logback, and java.util.logging are the Implementors. Your application binds to SLF4J; you choose the logging backend at deployment time without touching application code.
✅ Best Practice: The Bridge pattern delivers maximum value when you define the Implementor interface before writing any concrete implementor. Resist the temptation to derive the interface from the first concrete implementation — that almost always leaks implementation-specific concepts into what should be a clean abstraction. Think about what operations the Abstraction needs, and define the Implementor to serve those needs. JDBC’s Connection, Statement, and ResultSet interfaces were designed this way: they model relational database operations in database-agnostic terms.
Bridge vs Adapter vs Strategy
These three patterns often come up in the same conversation because they all involve one class delegating to another via an interface. The differences are in intent and timing.
The Adapter is a retrofit: you have two incompatible existing classes and you write a third to translate between them. It’s a fix for a mismatch that already exists. The Bridge is a design upfront: you’re aware that two dimensions of variation will grow independently, and you structure the code to allow that before any class explosion happens. The Strategy pattern looks identical to the Bridge implementation side — a context holds a reference to an interchangeable algorithm — but the intent is narrower: swapping behaviour at runtime, not managing an independent hierarchy of implementations.
In practice: if you’re retrofitting existing code, reach for Adapter. If you’re designing and you know you’ll have M × N growth, reach for Bridge. If you want to make a single algorithm interchangeable, reach for Strategy.
When to Use the Bridge Pattern
Reach for Bridge when: you have two dimensions that each need to grow independently and you want to avoid the M×N class count. You want to switch implementations at runtime (different database drivers, different rendering backends). You want to share an implementation across multiple abstractions without inheritance. You’re building a platform that supports multiple backends (SQL databases, NoSQL stores, file systems, cloud providers) and you want application code to be completely decoupled from the backend choice.
Avoid it when: you only have one implementation today and no credible near-term reason for a second. Bridge adds indirection and requires more upfront design; applying it prematurely adds complexity without benefit. If you have a mismatch between two existing classes rather than a design question about future variation, Adapter is the right tool.
⚠️ The YAGNI Tension: Bridge is one of those patterns where experienced developers sometimes disagree on when to apply it. It is genuinely more complex upfront. The rule of thumb: if you can already name two concrete implementations (not hypotheticals), or if an existing interface already imposes a clean contract, Bridge is worth the indirection. If you’re designing speculatively for a second implementation that might never materialize, resist the pattern until the second implementor actually arrives.
Runnable Code on GitHub
The complete, runnable code for this article is at ankurm.com/git.app/asmhatre/design-patterns under 02-structural/bridge/. Clone and run:
javac bridge/*.java -d out/bridge
java -cp out/bridge bridge.Main
See Also
- Adapter Design Pattern in Java — the pattern to reach for when you have an existing incompatibility rather than designing for future variation
- Composite Design Pattern in Java — another structural pattern that composes objects into tree structures
- Facade Design Pattern in Java — simplifies a complex subsystem with a single entry-point interface
Further Reading
- Bridge — Refactoring.Guru
- The Bridge Pattern in Java — Baeldung
- Design Patterns: Elements of Reusable Object-Oriented Software — Gamma, Helm, Johnson, Vlissides, Chapter 4
No Comments yet!