
In this tutorial, we will be creating a simple “Hello world” program using Struts 2. For this tutorial we will be using Eclipse, Struts 2. Struts 2 allows you to define configuration either by using traditional Struts 1 like XML way or by using annotations. In this tutorial we will be following traditional XML way. Let’s move ahead!
1. To make things more simpler
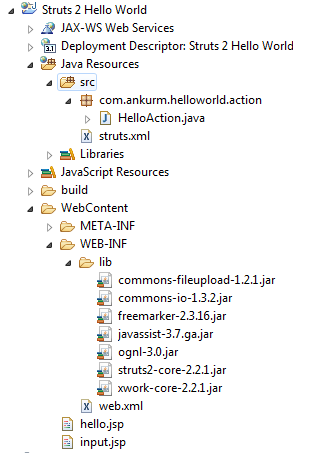
Here is directory structure of the project or you can download this whole project by clicking here.
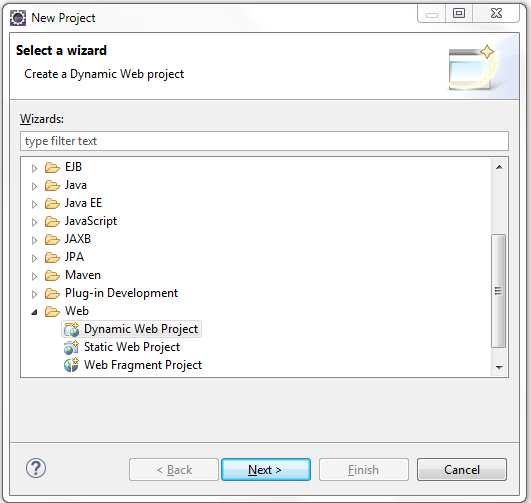
2. Let’s create a project
Here in this case, we will be creating a Dynamic web project.
Note:
- Apache tomcat will be required to run your project. Make sure that you have already downloaded Apache tomcat and extracted it in some folder.
- If you are using Dynamic Web Module Version 3.0 or greater than don’t forget to check Generate web.xml deployment descriptor before hitting finish button.
3. Add Struts 2 Dependencies
Once project is created, we will need to add Struts 2 Dependencies. Simply download all files listed below and copy them to WebContent > WEB-INF > lib folder of your project.
- struts2-core-2.2.1
- ognl-3.0
- javassist-3.7.ga
- freemarker-2.3.16
- commons-io-1.3.2
- commons-fileupload-1.2.1
- xwork-core-2.2.1
4. web.xml
Now we will be configuring our web.xml i.e. deployment descriptor to integrate Struts 2 in our web project.
<?xml version="1.0" encoding="UTF-8"?>
<web-app xmlns:xsi="http://www.w3.org/2001/XMLSchema-instance"
	xmlns="http://xmlns.jcp.org/xml/ns/javaee"
	xsi:schemaLocation="http://xmlns.jcp.org/xml/ns/javaee http://xmlns.jcp.org/xml/ns/javaee/web-app_3_1.xsd"
	id="WebApp_ID" version="3.1">
  	<display-name>Struts 2 Hello World</display-name>
  	<welcome-file-list>
	    <welcome-file>index.html</welcome-file>
	    <welcome-file>index.htm</welcome-file>
	    <welcome-file>index.jsp</welcome-file>
	    <welcome-file>default.html</welcome-file>
	    <welcome-file>default.htm</welcome-file>
	    <welcome-file>default.jsp</welcome-file>
	</welcome-file-list>
  	<filter>
		<filter-name>struts2</filter-name>
		<filter-class>org.apache.struts2.dispatcher.ng.filter.StrutsPrepareAndExecuteFilter</filter-class>
	</filter>
	<filter-mapping>
		<filter-name>struts2</filter-name>
		<url-pattern>/*</url-pattern>
	</filter-mapping>
</web-app>
5. Creating JSP pages
In this case we will need two JSP pages. One for taking input and another for displaying output.
File: input.jsp – This will take text string as an input
<%@ page language="java" contentType="text/html; charset=ISO-8859-1"
    pageEncoding="ISO-8859-1"%>
<%@ taglib prefix="s" uri="/struts-tags"%>
<!DOCTYPE html PUBLIC "-//W3C//DTD HTML 4.01 Transitional//EN" "http://www.w3.org/TR/html4/loose.dtd">
<html>
<head>
	<meta http-equiv="Content-Type" content="text/html; charset=ISO-8859-1">
	<title>Hello World input</title>
</head>
<body>
	<h1>Struts 2 Hello World Example</h1>

	<s:form action="Hello">
		<s:textfield name="input" label="Input" />
		<s:submit />
	</s:form>
</body>
</html>
File: hello.jsp – This will show output.
<%@ page language="java" contentType="text/html; charset=ISO-8859-1"
    pageEncoding="ISO-8859-1"%>
<%@ taglib prefix="s" uri="/struts-tags"%>
<!DOCTYPE html PUBLIC "-//W3C//DTD HTML 4.01 Transitional//EN" "http://www.w3.org/TR/html4/loose.dtd">
<html>
<head>
	<meta http-equiv="Content-Type" content="text/html; charset=ISO-8859-1">
	<title>Hello World input</title>
</head>
<body>
	Hello <s:property value="input" />
</body>
</html>
6. HelloAction.java, where all action happens
Now we will be creating an action class. This is the place where all action happens. Here you can specify business logic. In this case we will be returning a simple string, which will be then used by Struts to load appropriate JSP page.
package com.ankurm.helloworld.action;

public class HelloAction {
	private String input;

	public String getInput() {
		return input;
	}

	public void setInput(String input) {
		this.input = input;
	}

	//Struts logic block
	public String execute() {
		return "SUCCESS";
	}
}
7. struts.xml
Now let’s configure Struts. In this file we are binding various actions to actual java classes.
<?xml version="1.0" encoding="UTF-8" ?>
<!DOCTYPE struts PUBLIC
"-//Apache Software Foundation//DTD Struts Configuration 2.0//EN"
"http://struts.apache.org/dtds/struts-2.0.dtd">

<struts>

	<package name="hello" namespace="/" extends="struts-default">
		<action name="input">
			<result>input.jsp</result>
		</action>
		<action name="Hello" class="com.ankurm.helloworld.action.HelloAction">
			<result name="SUCCESS">hello.jsp</result>
		</action>
	</package>

</struts>
Here the package is nothing but combination of multiple actions. Namespace is nothing but prefix to action while extends specifies we are extending the struts-default package components and interceptors, which is declared in the struts-default.xml file, located at the root of the struts2-core.jar file.
8. Running the project
Simply right-click on project and select Run As > Run on server. Then you can navigate to following link (if browser doesn’t opens)
http://localhost:15580/Struts_2_Hello_World/input
Note:
- Make sure you are using correct port number. For me it is 15580, for you it might be different.
- The suffix .action is optional while calling an action.
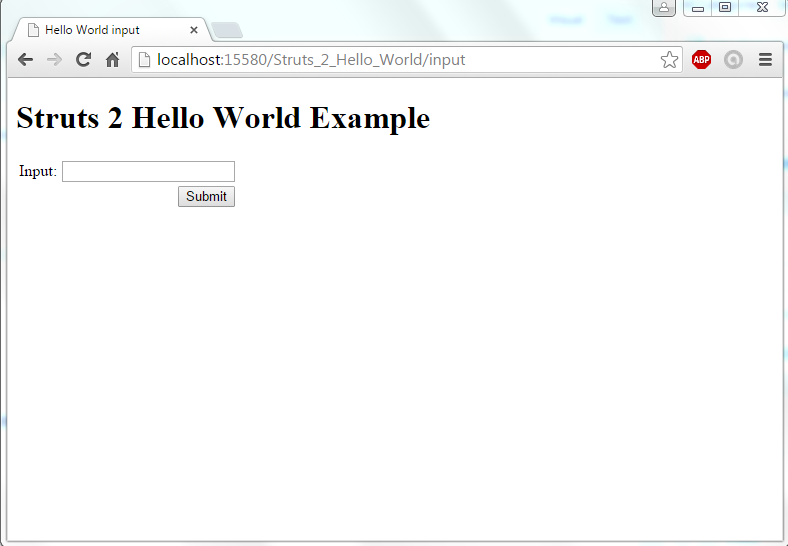
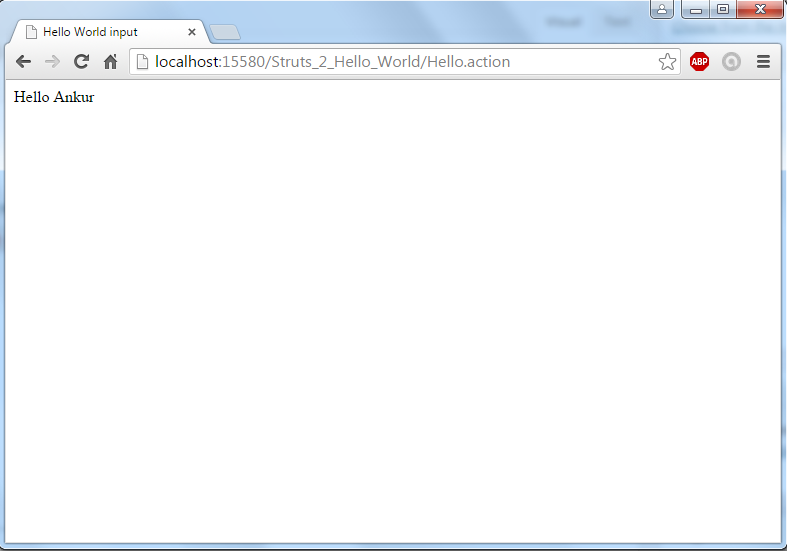
Enter your name and click on submit button. You will be redirected to hello.action.
That’s all. You can download this whole project by clicking here.
thanks for uploading