
As developers, we often face scenarios where a request needs to go through a series of processing steps, validations, or transformations. A naive approach might involve a massive if-else if-else block or a complex switch statement. This code quickly becomes rigid, hard to maintain, and a nightmare to extend. What if you could create a flexible pipeline where each step can decide whether to handle the request or simply pass it along?
This is precisely the problem the Chain of Responsibility pattern solves. It’s a behavioral design pattern that lets you build a chain of processing objects. A request enters the chain and is passed from one object to the next until one of them handles it.
The core idea is to decouple the sender of a request from its receivers, giving multiple objects a chance to handle the request.
Think of an ATM dispensing cash. When you request an amount, the machine doesn’t just grab a random mix of bills. It has a logic: first, try to dispense the largest denominations (like $50 bills), then pass the remaining amount to the next dispenser (e.g., $20 bills), and so on, until the full amount is dispensed. Each dispenser in this chain is a handler.
What is the Chain of Responsibility Pattern?
The pattern consists of a source that initiates a request and a series of “handler” objects. Each handler contains a reference to the next handler in the chain and implements a common interface for processing requests.
When a handler receives a request, it has two choices:
- Process the request. If it’s capable and responsible for this type of request, it handles it. It might also decide to pass the request down the chain after partial processing.
- Pass the request. If it cannot handle the request, it simply forwards it to the next handler in the chain.
This creates a clean, loosely-coupled system. The client that sends the request only needs to know about the first handler in the chain. It has no idea which handler will ultimately process the request.
Core Components
- Handler Interface: Defines a method to process a request and another to set the next handler in the chain.
- Concrete Handlers: Implement the Handler interface. Each one knows how to handle a specific type of request. If it can’t, it delegates to the next handler.
- Client: Creates the chain of handlers and sends the initial request to the first handler in the chain.
Visualizing the Pattern (UML)
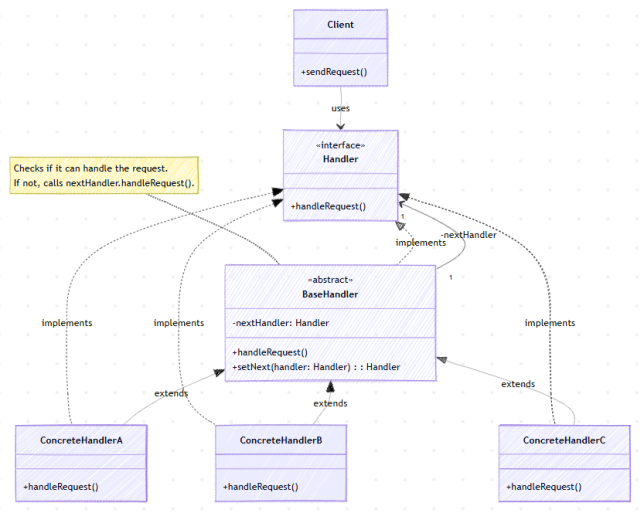
A typical UML diagram for this pattern shows a Handler interface with a handleRequest() method. A BaseHandler abstract class often implements this interface and contains a reference to the nextHandler. Finally, several ConcreteHandler classes extend BaseHandler, each implementing their specific logic inside handleRequest() and calling super.handleRequest() to pass it down the chain if necessary.
Let’s Build It: An ATM Cash Dispenser Example
There’s no better way to understand a pattern than by building it. Let’s implement the ATM cash dispenser we discussed earlier. The system will receive a currency amount and dispense it using a chain of handlers, each responsible for a specific bill denomination ($50, $20, $10).
Step 1: The Request Object (Currency)
First, let’s define a simple object to hold the amount to be dispensed. This object will be the “request” that we pass along the chain.
// The request object
public class Currency {

    private int amount;

    public Currency(int amount) {
        this.amount = amount;
    }

    public int getAmount() {
        return this.amount;
    }
}
Step 2: The Handler Interface
Next, we define our DispenseChain interface. This is the contract that all our concrete handlers (the bill dispensers) must follow. It has a method to link to the next handler and a method to process the dispense request.
// The Handler interface
public interface DispenseChain {

    void setNextChain(DispenseChain nextChain);

    void dispense(Currency cur);
}
Step 3: The Concrete Handlers
This is where the magic happens. We’ll create a handler for each bill denomination. Each handler will check if it can dispense bills for the given amount. If it can, it calculates how many bills to dispense, updates the remaining amount, and passes that remainder to the next handler in the chain.
Let’s start with the $50 bill dispenser.
// Concrete Handler for $50 bills
public class Dollar50Dispenser implements DispenseChain {

    private DispenseChain chain;

    @Override
    public void setNextChain(DispenseChain nextChain) {
        this.chain = nextChain;
    }

    @Override
    public void dispense(Currency cur) {
        if (cur.getAmount() >= 50) {
            int num = cur.getAmount() / 50;
            int remainder = cur.getAmount() % 50;
            System.out.println("Dispensing " + num + " $50 note(s)");

            // If there is a remainder, pass it to the next handler
            if (remainder != 0) {
                this.chain.dispense(new Currency(remainder));
            }
        } else {
            // If it can't handle it, pass the whole amount to the next handler
            this.chain.dispense(cur);
        }
    }
}
Notice the core logic in dispense(): it either processes and passes the remainder, or it passes the original request if it can’t handle it at all. Now, let’s create the handlers for $20 and $10 bills. They follow the exact same logic.
// Concrete Handler for $20 bills
public class Dollar20Dispenser implements DispenseChain {

    private DispenseChain chain;

    @Override
    public void setNextChain(DispenseChain nextChain) {
        this.chain = nextChain;
    }

    @Override
    public void dispense(Currency cur) {
        if (cur.getAmount() >= 20) {
            int num = cur.getAmount() / 20;
            int remainder = cur.getAmount() % 20;
            System.out.println("Dispensing " + num + " $20 note(s)");

            if (remainder != 0) {
                this.chain.dispense(new Currency(remainder));
            }
        } else {
            this.chain.dispense(cur);
        }
    }
}

// Concrete Handler for $10 bills
public class Dollar10Dispenser implements DispenseChain {

    private DispenseChain chain;

    @Override
    public void setNextChain(DispenseChain nextChain) {
        this.chain = nextChain;
    }

    @Override
    public void dispense(Currency cur) {
        if (cur.getAmount() >= 10) {
            int num = cur.getAmount() / 10;
            int remainder = cur.getAmount() % 10;
            System.out.println("Dispensing " + num + " $10 note(s)");

            if (remainder != 0) {
                // There is no next handler, but we could add one!
                // Or handle the error here.
                System.out.println("Cannot dispense remaining amount: $" + remainder);
            }
        } else {
            // Also an end-of-chain scenario
            System.out.println("Cannot dispense remaining amount: $" + cur.getAmount());
        }
    }
}
Note that the $10Dispenser is the last one in our chain. It doesn’t pass the request on. It either handles it or reports an error. This is an important design consideration: what happens at the end of the chain?
Step 4: The Client – Building and Running the Chain
Finally, the client code is responsible for building the chain of handlers and initiating the request. The client links the handlers together in the desired order.
import java.util.Scanner;

public class ATMDispenseChain {

    private DispenseChain c1;

    public ATMDispenseChain() {
        // Initialize the chain
        this.c1 = new Dollar50Dispenser();
        DispenseChain c2 = new Dollar20Dispenser();
        DispenseChain c3 = new Dollar10Dispenser();

        // Set the chain of responsibility
        c1.setNextChain(c2);
        c2.setNextChain(c3);
    }

    public static void main(String[] args) {
        ATMDispenseChain atmDispenser = new ATMDispenseChain();

        while (true) {
            int amount = 0;
            System.out.println("Enter amount to dispense (must be a multiple of 10):");
            Scanner input = new Scanner(System.in);
            amount = input.nextInt();

            if (amount % 10 != 0) {
                System.out.println("Amount must be a multiple of 10.");
                return;
            }

            // Process the request
            atmDispenser.c1.dispense(new Currency(amount));
        }
    }
}
When you run this code and enter an amount like 280, the output will be:
Dispensing 5 $50 note(s)
Dispensing 1 $20 note(s)
Dispensing 1 $10 note(s)
The request for $280 was first sent to the $50Dispenser. It handled $250 and passed the remaining $30 to the $20Dispenser. It handled $20 and passed the remaining $10 to the $10Dispenser, which completed the request.
Advantages of Chain of Responsibility
- Decoupling: The sender of a request doesn’t know who will handle it. The handlers also don’t know who the original sender is. They just receive a request and process it or pass it on.
- Flexibility and Extensibility: You can add new handlers or change the order of handlers in the chain at runtime without affecting the client code. This adheres to the Open/Closed Principle.
- Single Responsibility Principle: Each handler is small and focused on a specific task. This makes the code cleaner and easier to test and maintain.
Potential Downsides
- Request Not Handled: A request might travel the entire chain and never be handled if no handler is configured to process it. Your design must account for this “end-of-chain” scenario (e.g., by logging an error or throwing an exception).
- Performance: If the chain is very long, a request might have to travel through many handlers before it’s processed, which could introduce latency.
Real-World Examples in the JDK
You’ve likely used this pattern without even realizing it:
javax.servlet.Filter#doFilter(): In Java web applications, servlet filters form a classic chain. Each filter in the chain can inspect/modify the HTTP request and response. When a filter is done, it calls chain.doFilter(request, response) to pass control to the next filter in the chain, and eventually to the servlet itself.java.util.logging.Logger#log(): The Java logging framework uses a hierarchy of loggers. When you log a message, it’s passed up the parent-child tree of loggers until a handler is found that can process it at the configured log level.
Conclusion
The Chain of Responsibility pattern is a powerful tool for building flexible and maintainable processing pipelines. It’s ideal for situations where you have a series of potential handlers for a request and you don’t want to couple the sender to a specific receiver.
By promoting loose coupling and single responsibility, it allows you to create clean, modular systems that are easy to extend and reconfigure. The next time you find yourself writing a long if-else chain, consider whether the Chain of Responsibility pattern could offer a more elegant solution.
No Comments yet!