Tag Archives: Spring Boot

Spring Boot — convention-over-configuration framework for building Spring-based Java applications

Testing Microservices with JUnit 6: Integration, Contract & E2E

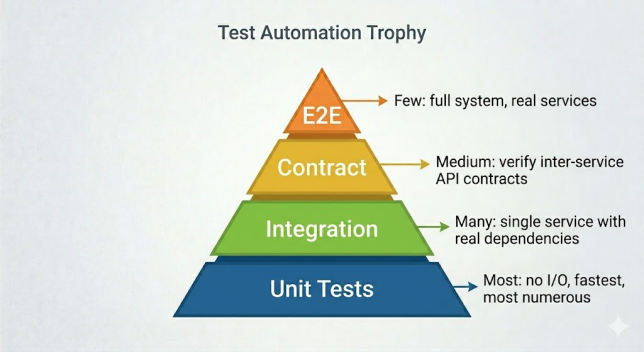
Testing microservices is fundamentally different from testing a monolith. You have distributed state, network boundaries, independent deployments, and inter-service contracts that can drift apart silently. A solid microservices testing strategy with JUnit 6 operates at three distinct levels: integration tests within a single service, contract tests between services, and end-to-end tests across the entire system. This guide covers all three with concrete, production-grade examples.

The Microservices Testing Pyramid

Level 1: Integration Tests Within a Single Service

Integration tests for a microservice verify that all layers of the service work together correctly — controller, service, repository, and database — but in isolation from other services. External service calls are stubbed using WireMock.

<!-- WireMock: HTTP stub server for testing external service calls -->
<dependency>
    <groupId>org.wiremock</groupId>
    <artifactId>wiremock-jetty12</artifactId>
    <version>3.9.1</version>
    <scope>test</scope>
</dependency>
import com.github.tomakehurst.wiremock.client.WireMock;
import com.github.tomakehurst.wiremock.junit5.WireMockExtension;
import org.junit.jupiter.api.extension.RegisterExtension;

@SpringBootTest(webEnvironment = SpringBootTest.WebEnvironment.RANDOM_PORT)
@Testcontainers
@DisplayName("Order Service — integration test with stubbed inventory service")
class OrderServiceIntegrationTest {

    // Testcontainers: real PostgreSQL for the order service’s own database
    @Container
    static final PostgreSQLContainer<?> postgres =
        new PostgreSQLContainer<>("postgres:16-alpine");

    // WireMock: stub server simulating the external Inventory Service
    @RegisterExtension
    static WireMockExtension inventoryServiceStub = WireMockExtension.newInstance()
        .options(wireMockConfig().dynamicPort())
        .build();

    @DynamicPropertySource
    static void configureProperties(DynamicPropertyRegistry registry) {
        // Point the order service’s datasource to the Testcontainers DB
        registry.add("spring.datasource.url",      postgres::getJdbcUrl);
        registry.add("spring.datasource.username", postgres::getUsername);
        registry.add("spring.datasource.password", postgres::getPassword);

        // Point the order service’s inventory client to the WireMock stub
        registry.add("inventory.service.url",
            () -> inventoryServiceStub.baseUrl());
    }

    @Autowired
    private TestRestTemplate restTemplate;

    @Test
    @DisplayName("Creating order succeeds when inventory has sufficient stock")
    void creatingOrderSucceedsWhenStockAvailable() {
        // Stub: inventory service confirms stock is available
        inventoryServiceStub.stubFor(
            WireMock.get(WireMock.urlPathEqualTo("/api/inventory/LAPTOP-01"))
                .willReturn(WireMock.aResponse()
                    .withHeader("Content-Type", "application/json")
                    .withBody("{"productId":"LAPTOP-01","available":true,"quantity":50}")
                    .withStatus(200))
        );

        // Act: call the order service
        CreateOrderRequest request =
            new CreateOrderRequest("[email protected]", "LAPTOP-01", 1);
        ResponseEntity<OrderDto> response =
            restTemplate.postForEntity("/api/orders", request, OrderDto.class);

        // Assert
        assertEquals(HttpStatus.CREATED, response.getStatusCode());
        assertEquals(OrderStatus.CONFIRMED, response.getBody().getStatus());

        // Verify the order service actually called the inventory service
        inventoryServiceStub.verify(1,
            WireMock.getRequestedFor(
                WireMock.urlPathEqualTo("/api/inventory/LAPTOP-01")));
    }

    @Test
    @DisplayName("Creating order fails when inventory has no stock")
    void creatingOrderFailsWhenOutOfStock() {
        inventoryServiceStub.stubFor(
            WireMock.get(WireMock.urlPathEqualTo("/api/inventory/SOLD-OUT-01"))
                .willReturn(WireMock.aResponse()
                    .withBody("{"productId":"SOLD-OUT-01","available":false,"quantity":0}")
                    .withStatus(200))
        );

        CreateOrderRequest request =
            new CreateOrderRequest("[email protected]", "SOLD-OUT-01", 1);
        ResponseEntity<ErrorDto> response =
            restTemplate.postForEntity("/api/orders", request, ErrorDto.class);

        assertEquals(HttpStatus.CONFLICT, response.getStatusCode());
        assertTrue(response.getBody().getMessage().contains("out of stock"));
    }
}
Continue reading Testing Microservices with JUnit 6: Integration, Contract & E2E

Testing REST APIs with JUnit 6: MockMvc vs WebTestClient

Testing REST APIs is one of the most common tasks in any Spring Boot project. JUnit 6 supports two primary approaches: MockMvc for servlet-based (synchronous) APIs and WebTestClient for reactive (WebFlux) APIs — though WebTestClient can also test traditional Spring MVC applications. This guide covers both tools in depth with real request/response examples, JSON path assertions, and patterns for testing authentication, error responses, and pagination.

MockMvc vs WebTestClient: When to Use Which

MockMvcWebTestClient
TransportNo real HTTP — tests the servlet layer directlyReal or mock HTTP
Best forSpring MVC (traditional Servlet)WebFlux (reactive) or both
SpeedFastest — no networking overheadSlightly slower but more realistic
Fluent APIBuilder-style with matchersReactive, fluent chain
Works in @WebMvcTest✅ Yes (auto-configured)✅ Yes (with @AutoConfigureMockMvc)

Part 1: Testing REST APIs with MockMvc

Setup and Auto-Configuration

import org.springframework.boot.test.autoconfigure.web.servlet.AutoConfigureMockMvc;
import org.springframework.boot.test.context.SpringBootTest;
import org.springframework.test.web.servlet.MockMvc;
import org.springframework.beans.factory.annotation.Autowired;
import static org.springframework.test.web.servlet.request.MockMvcRequestBuilders.*;
import static org.springframework.test.web.servlet.result.MockMvcResultMatchers.*;
import static org.springframework.test.web.servlet.result.MockMvcResultHandlers.*;

@SpringBootTest
@AutoConfigureMockMvc // injects MockMvc with full security and filters
@DisplayName("Product API — MockMvc tests")
class ProductApiMockMvcTest {

    @Autowired
    private MockMvc mockMvc;

    @Autowired
    private ProductRepository productRepository; // used for test data setup

    @BeforeEach
    void seedTestData() {
        productRepository.deleteAll();
        productRepository.saveAll(List.of(
            new Product(null, "Laptop",     999.00, "Electronics"),
            new Product(null, "Headphones",  79.00, "Electronics"),
            new Product(null, "Notebook",    5.99,  "Stationery")
        ));
    }

    @Test
    @DisplayName("GET /api/products returns 200 with all products")
    void getAllProductsReturns200() throws Exception {
        mockMvc.perform(get("/api/products")
                .accept("application/json"))
            .andDo(print()) // prints request + response to console for debugging
            .andExpect(status().isOk())
            .andExpect(content().contentType("application/json"))
            .andExpect(jsonPath("$").isArray())
            .andExpect(jsonPath("$.length()").value(3))
            .andExpect(jsonPath("$[0].name").value("Laptop"));
    }
}
Continue reading Testing REST APIs with JUnit 6: MockMvc vs WebTestClient

JUnit 6 with Spring Boot: Unit, Slice, and Integration Testing

Spring Boot and JUnit 6 are the most widely used combination in the Java testing ecosystem. Together they give you a layered testing strategy — fast pure unit tests, focused slice tests that load only part of the Spring context, and full integration tests with a running application. This guide covers all three layers with complete, production-ready examples.

The Three Testing Layers

LayerAnnotationSpeedSpring ContextUse for
Unit@Test onlyVery fast (<10ms)NoneService logic, utilities, domain objects
Slice@WebMvcTest, @DataJpaTest, etc.Fast (1–5s)Partial — one layer onlyControllers, repositories, JSON serialization
Integration@SpringBootTestSlow (5–30s)Full application contextEnd-to-end flows, real DB, real HTTP

Setup: Spring Boot Test Dependency

<dependency>
    <groupId>org.springframework.boot</groupId>
    <artifactId>spring-boot-starter-test</artifactId>
    <scope>test</scope>
    <!-- spring-boot-starter-test bundles:
         junit-jupiter, mockito-core, assertj-core,
         spring-test, hamcrest, jsonpath -->
</dependency>

Layer 1: Pure Unit Tests (No Spring Context)

For service and domain logic, avoid loading a Spring context entirely. Instantiate the class directly and mock dependencies with Mockito:

import org.junit.jupiter.api.*;
import org.mockito.InjectMocks;
import org.mockito.Mock;
import org.mockito.junit.jupiter.MockitoExtension;
import static org.junit.jupiter.api.Assertions.*;
import static org.mockito.Mockito.*;

// @ExtendWith(MockitoExtension.class): activates Mockito annotation processing
// No Spring context loaded — this test runs in milliseconds
@ExtendWith(MockitoExtension.class)
@DisplayName("OrderService — unit tests")
class OrderServiceTest {

    // @Mock creates a Mockito mock and injects it into @InjectMocks
    @Mock
    private OrderRepository orderRepository;

    @Mock
    private EmailService emailService;

    // @InjectMocks creates an instance with mocked dependencies injected
    @InjectMocks
    private OrderService orderService;

    @Test
    @DisplayName("Creating an order saves it and sends a confirmation email")
    void creatingOrderSavesItAndSendsConfirmationEmail() {
        // Arrange: define mock behaviour
        Order savedOrder = new Order(1L, "[email protected]", 99.99, OrderStatus.PENDING);
        when(orderRepository.save(any(Order.class))).thenReturn(savedOrder);

        // Act
        Order result = orderService.createOrder("[email protected]", 99.99);

        // Assert: verify result and interactions
        assertNotNull(result);
        assertEquals(OrderStatus.PENDING, result.getStatus());
        verify(orderRepository, times(1)).save(any(Order.class));
        verify(emailService,    times(1)).sendConfirmation("[email protected]");
    }

    @Test
    @DisplayName("Creating an order with negative total throws IllegalArgumentException")
    void negativeOrderTotalThrowsException() {
        assertThrows(IllegalArgumentException.class,
            () -> orderService.createOrder("[email protected]", -1.00));
        // Verify no repository or email interaction occurred
        verifyNoInteractions(orderRepository, emailService);
    }
}
Continue reading JUnit 6 with Spring Boot: Unit, Slice, and Integration Testing

A Developer’s Guide to Testing Spring REST Clients with @RestClientTest

In modern microservices architecture, it’s rare for a service to live in complete isolation. Most applications need to communicate with other services over the network, typically via REST APIs. When you build a component that consumes an external REST API, a critical question arises: how do you test it reliably without actually making network calls to a live, and potentially unstable, external service?

This is where Spring Boot’s test slices come to the rescue. For testing your REST clients, the framework provides a powerful and elegant solution: the @RestClientTest annotation. Let’s dive deep into how you can use it to write clean, fast, and reliable tests for your HTTP client components.

What Exactly is @RestClientTest?

@RestClientTest is a “test slice” annotation specifically designed to test REST client components. Instead of loading your entire Spring application context (like @SpringBootTest does), it focuses only on the beans relevant to REST client operations. This makes your tests significantly faster and less prone to side effects from unrelated configurations.

When you use @RestClientTest, Spring Boot will auto-configure the following for you:

  • The Client Under Test: The specific REST client bean you want to test.
  • MockRestServiceServer: A bean that lets you mock the server-side responses. You can instruct it: “When my client calls /api/employees/1, respond with this specific JSON.”
  • RestTemplateBuilder: Used to help construct RestTemplate instances.
  • Jackson/Gson Support: It automatically includes support for serializing and deserializing JSON, so you can test your client-side data mapping.

In short, it provides the perfect, minimal environment to verify that your client builds the correct HTTP request and correctly parses the HTTP response — all without a single packet leaving your machine.

Continue reading A Developer’s Guide to Testing Spring REST Clients with @RestClientTest

Mastering Hibernate 7 with Spring Boot 4: The Next-Gen Configuration & Performance Guide

Are you ready to move your data layer into the future? Configuring Hibernate 7 with Spring Boot 4 represents a significant milestone in the Java ecosystem. As Spring Boot 4 is expected to align with Jakarta EE 11+ APIs and Hibernate 7 introduces native JSON support and refined type systems, developers are encountering new challenges—from namespace migrations to the anticipated Java 21 (and future Java 25) baselines. If your application feels stuck in the past, this guide is your roadmap to the cutting edge.

In this deep-dive guide, we’ll explore the high-performance world of Spring Boot 4. We will cover the mandatory shifts in Jakarta Persistence 3.2, advanced performance tuning for virtual threads, and how to leverage Hibernate 7’s modern features to ensure your application on ankurm.com is ready for the evolving landscape of 2026 and beyond.

The Problem: Legacy Debt in a Modern World

Many applications are still tethered to the legacy javax.* namespace or older Hibernate versions that lack the efficiency of modern JVM features like Project Loom (Virtual Threads). Using outdated configurations leads to “Namespace Collision” errors and missed opportunities for the significant memory and performance optimizations anticipated in modern runtime environments.

The Agitation: The Risk of Stagnation

As Java moves toward the anticipated widespread adoption of Java 21 and the eventual standard of Java 25, staying on Spring Boot 2 or 3 becomes an increasing security and performance liability. Hibernate 7 introduces breaking changes in how it handles specific database dialects and type mappings. Failing to plan your migration now could lead to technical debt, incompatible libraries, and a data layer that cannot fully leverage modern hardware.

The Solution: Harnessing Spring Boot 4 & Hibernate 7

Spring Boot 4 is being designed for speed, native compilation (GraalVM), and seamless integration with Hibernate 7. By migrating to the jakarta.persistence namespace and leveraging the “Unified Type System” introduced in Hibernate 7, we can build data layers that are significantly leaner and more performant.

Continue reading Mastering Hibernate 7 with Spring Boot 4: The Next-Gen Configuration & Performance Guide

Building Native Images of Spring Boot Applications with GraalVM: A Step-by-Step Guide

In the ever-evolving landscape of cloud-native development and serverless architectures, the demand for applications with lightning-fast startup times and minimal memory footprints is greater than ever. Java, traditionally known for its “write once, run anywhere” philosophy, has sometimes faced criticism regarding these very aspects. However, with the advent of GraalVM and Spring Boot’s dedicated support, Java is now a formidable contender in this space.

This post will guide you through the process of building GraalVM native images of your Spring Boot native applications (specifically Spring Boot 3.x), demonstrating how to unlock significant optimizations in startup time and memory consumption, perfect for serverless Java and general cloud native Java deployments.

Why Native Images? The GraalVM Advantage

Traditional Java applications run on the Java Virtual Machine (JVM). While the JVM offers incredible runtime optimizations through its Just-In-Time (JIT) compiler, there’s an inherent overhead: the JVM itself needs to start, classes need to be loaded, and code needs to be JIT-compiled at runtime.

GraalVM Native Image technology compiles your Java application ahead-of-time (AOT) into a standalone executable. This executable includes the application code, required libraries, and a minimal runtime environment (the Substrate VM) – all compiled into a single binary.

The benefits are substantial:

  • Blazing Fast Startup: Native images typically start in milliseconds, making them ideal for serverless functions, microservices, and environments where rapid scaling is crucial.
  • Reduced Memory Footprint: By eliminating the JVM overhead and only including the necessary code paths, native images use significantly less memory.
  • Smaller Deployment Size: The resulting binary is often much smaller than a traditional JAR file bundled with a JRE.
  • Lower Resource Consumption: Less CPU and memory usage translates to lower operational costs in cloud environments.

Spring Boot 3.x has embraced GraalVM native image compilation with first-class support, making the process more seamless than ever.

Continue reading Building Native Images of Spring Boot Applications with GraalVM: A Step-by-Step Guide