
Most developers use JUnit 6 daily without thinking about what happens under the hood when they click “Run.” Understanding the JUnit 6 architecture — how the Platform discovers tests, how Engines execute them, and how Launchers tie it all together — makes you a dramatically more effective tester. You will debug mysterious “0 tests found” issues in seconds, build custom extensions with confidence, and understand why certain configurations behave the way they do.
The Three-Pillar Architecture
JUnit 6 is not a single monolithic library. It is composed of three distinct modules, each with a clearly defined responsibility:
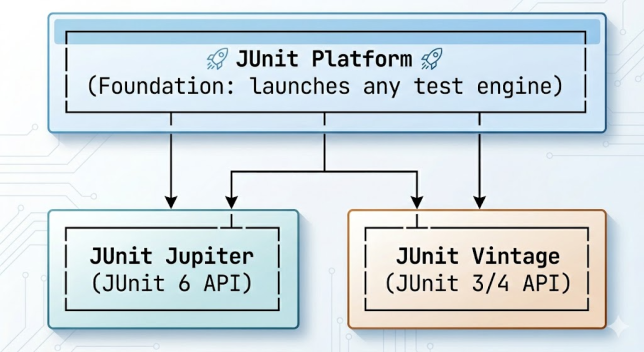
- JUnit Platform — The foundation. Defines the
TestEngineSPI and theLauncherAPI. Build tools (Maven, Gradle) and IDEs talk to the Platform, not to Jupiter or Vintage directly. - JUnit Jupiter — The JUnit 6 programming model. Contains all the annotations (
@Test,@BeforeEach, etc.), assertion classes, and theJupiterTestEnginethat understands them. - JUnit Vintage — A compatibility shim. Contains the
VintageTestEnginewhich wraps the old JUnit 4 runner so legacy tests can run on the JUnit Platform.
How a Test Run Works: Step by Step
When you run mvn test or click Run in your IDE, here is the exact sequence of events:
- Launcher is created — The
LauncherFactorycreates aLauncherinstance and discovers allTestEngineimplementations on the classpath via Java’sServiceLoadermechanism. - Discovery phase — The
Launchercalls each engine’sdiscover()method with aLauncherDiscoveryRequestspecifying what to discover (classpath roots, class selectors, method selectors, tag filters, etc.). - Each engine builds a TestDescriptor tree — The
JupiterTestEnginescans classes, finds@Testmethods, resolves@Nestedclasses, and builds a tree ofTestDescriptornodes representing the entire test plan. - Execution phase — The
Launchercalls each engine’sexecute()method. The engine walks its tree, fires lifecycle callbacks (@BeforeAll,@BeforeEach, etc.), invokes test methods, and reports results viaEngineExecutionListener. - Reporting — Listeners (Surefire, IDE, Allure) receive events (
executionStarted,executionFinished,executionSkipped) and build reports.
The TestEngine SPI
The TestEngine interface is the extension point that allows any testing framework to plug into the JUnit Platform. It has two mandatory methods:
import org.junit.platform.engine.TestEngine;
import org.junit.platform.engine.TestDescriptor;
import org.junit.platform.engine.EngineDiscoveryRequest;
import org.junit.platform.engine.ExecutionRequest;
import org.junit.platform.engine.UniqueId;

/**
 * Simplified illustration of how TestEngine works.
 * The JupiterTestEngine is a production implementation of this interface.
 */
public interface TestEngine {

    // A stable identifier for this engine (e.g. "junit-jupiter", "junit-vintage")
    String getId();

    // Phase 1: scan for tests and build a TestDescriptor tree
    TestDescriptor discover(EngineDiscoveryRequest discoveryRequest,
                            UniqueId uniqueId);

    // Phase 2: walk the TestDescriptor tree and run the tests
    void execute(ExecutionRequest executionRequest);
}
This clean SPI is why frameworks like Spock, Cucumber, and TestNG can all run their tests on the JUnit Platform by providing their own TestEngine implementation.
The Launcher and LauncherDiscoveryRequest
The Launcher is the entry point for programmatic test execution. Build tools and IDEs use it internally, but you can also use it directly in code:
import org.junit.platform.launcher.Launcher;
import org.junit.platform.launcher.LauncherDiscoveryRequest;
import org.junit.platform.launcher.core.LauncherFactory;
import org.junit.platform.launcher.core.LauncherDiscoveryRequestBuilder;
import org.junit.platform.launcher.listeners.SummaryGeneratingListener;
import org.junit.platform.engine.discovery.DiscoverySelectors;
import org.junit.platform.engine.discovery.TagFilter;

public class ProgrammaticTestRunner {

    public static void main(String[] args) {

        // Build a request: run all tests in com.example package tagged "fast"
        LauncherDiscoveryRequest request = LauncherDiscoveryRequestBuilder.request()
            .selectors(
                // Discover all tests in this package
                DiscoverySelectors.selectPackage("com.example")
            )
            .filters(
                // Only run tests with the 'fast' tag
                TagFilter.includeTags("fast")
            )
            .build();

        // Create a listener to collect results
        SummaryGeneratingListener summaryListener = new SummaryGeneratingListener();

        // Create the Launcher and execute
        Launcher launcher = LauncherFactory.create();
        launcher.discover(request); // optional: inspect plan before running
        launcher.execute(request, summaryListener);

        // Print the summary
        var summary = summaryListener.getSummary();
        System.out.println("Tests run: "    + summary.getTestsStartedCount());
        System.out.println("Tests passed: " + summary.getTestsSucceededCount());
        System.out.println("Tests failed: " + summary.getTestsFailedCount());
    }
}
Expected Console Output
Tests run: 12
Tests passed: 12
Tests failed: 0
Discovery Selectors: What Can You Select?
The DiscoverySelectors class provides factory methods to select exactly which tests to discover. These are what IDEs and build tools use internally:
| Selector | What it selects |
|---|---|
selectPackage("com.example") | All tests in the package and sub-packages |
selectClass(OrderServiceTest.class) | All tests in one specific class |
selectMethod(OrderServiceTest.class, "shouldCreateOrder") | One specific test method |
selectClasspathRoots(Set.of(Paths.get("target/test-classes"))) | All tests compiled to a classpath root |
selectUniqueId("[engine:junit-jupiter]...") | A specific test by its unique descriptor ID |
Extension Points in the Architecture
JUnit 6’s extension model hooks into the engine’s execution lifecycle at well-defined points. Extensions implement one or more callback interfaces, and the engine calls them in a predictable order:
Test Execution Lifecycle with Extensions:

[BeforeAllCallback]         ← extension hook
  @BeforeAll                ← test code
  [BeforeEachCallback]      ← extension hook
    @BeforeEach             ← test code
    [BeforeTestExecutionCallback] ← extension hook
      @Test method          ← YOUR TEST
    [AfterTestExecutionCallback]  ← extension hook
    @AfterEach              ← test code
  [AfterEachCallback]       ← extension hook
@AfterAll                   ← test code
[AfterAllCallback]          ← extension hook
Frequently Asked Questions (FAQs)
Q1: Why does Maven/Gradle say “0 tests found” even though my test classes exist?
The most common cause is a missing or incompatible TestEngine on the classpath. Without junit-jupiter-engine (included in the junit-jupiter aggregator), the Platform discovers no engine and therefore finds no tests. The second most common cause is a Surefire Plugin version older than 2.22.0. Verify both: your JUnit dependency includes the engine, and your Surefire/Gradle plugin version is current.
Q2: Can I have multiple TestEngines running in the same build?
Yes. The JUnit Platform supports multiple engines simultaneously. If you include both junit-jupiter and junit-vintage-engine, the Platform will discover and run both JUnit 6 tests and JUnit 4 tests in the same build, reporting all results together.
Q3: What is a UniqueId in JUnit 6?
Every test, test class, and test engine in the Platform has a UniqueId — a structured string that identifies it unambiguously within the test plan. For example: [engine:junit-jupiter]/[class:com.example.CalculatorTest]/[method:addingTwoPositiveNumbers()]. IDEs use UniqueIds to re-run specific tests without re-running the whole suite.
Q4: How does the JUnit Platform integrate with Maven Surefire?
Maven Surefire Plugin 3.x uses the ConsoleLauncher API of the JUnit Platform internally. When you run mvn test, Surefire creates a LauncherDiscoveryRequest based on your plugin configuration (includes, excludes, tags), passes it to the Launcher, and translates the results into Surefire’s XML report format.
Q5: Can I build my own TestEngine to support a custom test DSL?
Absolutely. Implementing the TestEngine interface and registering it via ServiceLoader (by adding a file to META-INF/services/org.junit.platform.engine.TestEngine) is all you need. Your engine can discover tests in any format — XML files, custom annotations, YAML specs — and they will run on the same Platform as Jupiter tests. See Build Your Own JUnit 6 Test Engine for a complete walkthrough.
See Also
- JUnit 6 Tutorial: Complete Series Index
- JUnit 6 vs JUnit 5: Key Differences and Migration Guide
- JUnit 6 Extensions Model: Build Custom Extensions Step-by-Step
- Build Your Own JUnit 6 Test Engine (Advanced Guide)
- Parallel Test Execution in JUnit 6: Configuration and Pitfalls
Conclusion
JUnit 6’s three-pillar architecture — Platform, Jupiter, Vintage — is elegant in its separation of concerns. The Platform handles discovery and execution orchestration. Jupiter provides the testing API. Vintage ensures backward compatibility. Together, they form a system where any test framework can plug in via the TestEngine SPI and run alongside your JUnit 6 tests.
Next: JUnit 6 Test Lifecycle Explained — learn exactly when @BeforeAll, @BeforeEach, @AfterEach, and @AfterAll run, and how to use them correctly.
No Comments yet!