Tag Archives: Java

Why Your JUnit Tests Are Slow (Performance Optimization Guide)

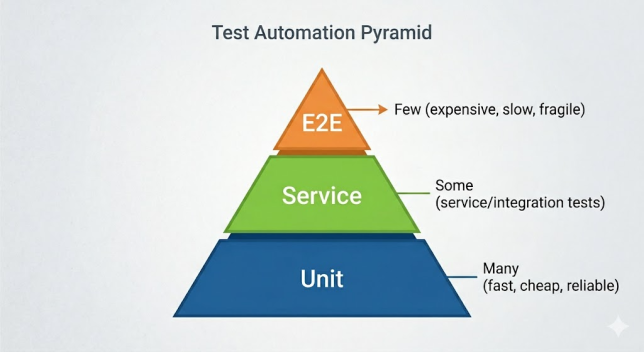
A test suite that takes 20 minutes to run does not get run. Developers skip it, work around it, or disable it entirely. Speed is not a nice-to-have in automated testing — it is fundamental to whether your tests actually provide value. This guide diagnoses every common cause of slow JUnit 6 tests and provides concrete, measurable optimisations with real performance numbers.

Measuring First: Identify Your Bottlenecks

Before optimising anything, measure. You need to know which tests are slowest before you can improve them.

# Maven: run tests and capture timing in the Surefire report
mvn test
# Check: target/surefire-reports/*.xml — each test has 'time' attribute

# Find the slowest tests across all XML reports
grep -h 'time=' target/surefire-reports/*.xml | 
  grep -oP 'time="[0-9.]+"' | 
  sort -t'"' -k2 -rn | 
  head -20

# Gradle: generate a test report with timing
./gradlew test
# Check: build/reports/tests/test/index.html
# Sort by duration in the 'Classes' tab

Problem 1: Spring Context Starts on Every Test Class

Starting a Spring ApplicationContext takes 3–10 seconds. If 20 test classes each trigger a fresh context, that is 60–200 seconds of pure startup overhead before a single assertion runs.

// SLOW: Different @MockBean in each class = unique context = fresh startup each time
@SpringBootTest
class OrderControllerTest {
    @MockBean PaymentGateway gateway;  // unique context config A
}

@SpringBootTest
class InvoiceControllerTest {
    @MockBean TaxCalculator taxCalc;   // unique context config B = ANOTHER startup
}

// FAST: Shared context configuration = Spring caches and reuses it
// Define all @MockBeans in ONE base class — all subclasses share the same context
@SpringBootTest
@MockBeanAnnotationsFromClass  // or simply put all @MockBeans here
public abstract class BaseIntegrationTest {
    // Declare ALL mocks used by ANY integration test here
    @MockBean protected PaymentGateway paymentGateway;
    @MockBean protected TaxCalculator  taxCalculator;
    @MockBean protected EmailService   emailService;
    // Spring starts ONE context for all subclasses = startup cost paid ONCE
}

class OrderControllerTest extends BaseIntegrationTest { /* tests */ }
class InvoiceControllerTest extends BaseIntegrationTest { /* tests */ }
// Context reused — 3-10 second startup paid ONCE instead of per class
Continue reading Why Your JUnit Tests Are Slow (Performance Optimization Guide)

How to Fix Flaky Tests in JUnit 6 (Root Causes + Solutions)

A flaky test is a test that sometimes passes and sometimes fails without any change to the code. Flaky tests are dangerous because they erode trust in the entire test suite — when developers see a red build, they think “probably just a flaky test” and ignore it, and one day that ignored red build is a real regression. This guide identifies every major root cause of flaky JUnit 6 tests and provides permanent, proven fixes for each one.

Why Flaky Tests Are Worse Than No Tests

A test that always fails is a clearly broken test — it gets fixed immediately. A test that occasionally fails trains your team to ignore failures. Once the team stops trusting the test suite, they stop acting on it, which defeats the entire purpose of automated testing. Zero tolerance for flaky tests is the correct policy.

Root Cause 1: Shared Mutable State

This is the most common cause. When tests share mutable state — a static field, a database row, a file on disk — the result depends on which test ran first.

// FLAKY: static counter shared across all test instances
private static int requestCounter = 0;

@Test
void firstRequestIncreasesCounterToOne() {
    service.processRequest();
    requestCounter++;
    assertEquals(1, requestCounter); // FLAKY if other tests also increment
}

// FIX: reset state before each test with @BeforeEach
private int requestCounter;  // instance field, NOT static

@BeforeEach
void resetCounter() {
    requestCounter = 0;  // fresh state for every test, guaranteed
    service.reset();     // also reset the service under test
}

@Test
void firstRequestIncreasesCounterToOne() {
    service.processRequest();
    requestCounter++;
    assertEquals(1, requestCounter); // always passes: counter starts at 0
}
Continue reading How to Fix Flaky Tests in JUnit 6 (Root Causes + Solutions)

Debugging JUnit 6 Tests: Fix Failures Like a Pro

A failing test is information — but only if you know how to extract it. Developers who debug test failures quickly share a systematic approach: they read error messages carefully, reproduce failures in isolation, understand their tools, and know where common failure patterns come from. This guide teaches you every technique you need to diagnose and fix JUnit 6 test failures like a professional.

Step 1: Read the Error Message Properly

Most developers skim error messages. Professional debuggers read them completely. Here is how to decode a JUnit 6 failure output:

org.opentest4j.AssertionFailedError: Order status should be CONFIRMED     <-- 1. Custom message (your clue)
  expected: <CONFIRMED>                                                    <-- 2. What you expected
   but was: <PENDING>                                                      <-- 3. What actually happened
	 at com.example.OrderServiceTest.lambda$0(OrderServiceTest.java:47)      <-- 4. Lambda inside assertAll
	 at org.junit.jupiter.api.AssertAll...                                   <-- framework frames (ignore)
	 at com.example.OrderServiceTest.placingValidOrderConfirmsIt(            <-- 5. Your test method
              OrderServiceTest.java:43)                                     <-- 6. Exact line in YOUR code

Decomposing the failure:
  1. "Order status should be CONFIRMED" — written by you in assertEquals(CONFIRMED, ..., "Order status..")
  2. expected: CONFIRMED — what the test asserts
  3. but was: PENDING   — what the code returned — THE REAL CLUE
  4. Lambda line — the assertion inside assertAll
  5+6. Your test method at line 43 — go here first

Step 2: Isolate the Failing Test

# Run just the failing test class
mvn test -Dtest=OrderServiceTest

# Run just the failing method
mvn test -Dtest=OrderServiceTest#placingValidOrderConfirmsIt

# Gradle equivalent
./gradlew test --tests "com.example.OrderServiceTest.placingValidOrderConfirmsIt"

# Run with verbose output to see all System.out from the test
mvn test -Dtest=OrderServiceTest -Dsurefire.useFile=false
Continue reading Debugging JUnit 6 Tests: Fix Failures Like a Pro

Refactoring Legacy Tests to JUnit 6 (Migration Playbook)

Every large Java codebase has a graveyard of old JUnit 4 tests — cluttered with @RunWith, @Rule, and Assert.assertEquals imports, written in a style that made sense in 2012 but feels dated today. Migrating them to JUnit 6 is not just a mechanical annotation swap — it is an opportunity to dramatically improve readability, reliability, and maintainability. This guide gives you a systematic migration playbook with exact before/after code for every common JUnit 4 pattern.

Phase 1: Automated Migration — Update Dependencies First

<!-- BEFORE: JUnit 4 -->
<dependency>
    <groupId>junit</groupId>
    <artifactId>junit</artifactId>
    <version>4.13.2</version>
    <scope>test</scope>
</dependency>

<!-- AFTER: JUnit 6 aggregator + Vintage engine for gradual migration -->
<dependency>
    <groupId>org.junit.jupiter</groupId>
    <artifactId>junit-jupiter</artifactId>
    <version>6.0.0</version>
    <scope>test</scope>
</dependency>

<!-- Vintage engine: allows JUnit 4 tests to run on JUnit 6 Platform during migration -->
<dependency>
    <groupId>org.junit.vintage</groupId>
    <artifactId>junit-vintage-engine</artifactId>
    <version>6.0.0</version>
    <scope>test</scope>
</dependency>

With the Vintage engine in place, your existing JUnit 4 tests continue to run while you migrate class by class. This gradual approach eliminates the risk of a big-bang migration.

Phase 2: Annotation Migration Reference

JUnit 4JUnit 6Notes
@Test@TestSame name, different import: org.junit.jupiter.api.Test
@Before@BeforeEachRuns before each test method
@After@AfterEachRuns after each test method
@BeforeClass@BeforeAllMust still be static (unless PER_CLASS lifecycle)
@AfterClass@AfterAllSame as above
@Ignore@DisabledAccepts an optional reason string
@Category@TagString-based, no interface needed
@RunWith(X.class)@ExtendWith(X.class)Multiple extensions allowed
@RuleExtension SPIEach Rule has a JUnit 6 extension equivalent
@ClassRule@RegisterExtension staticStatic field with extension instance
Assert.assertEqualsAssertions.assertEqualsNew package; expected/actual order same
Assert.assertThatassertThat (AssertJ)Hamcrest still works; AssertJ is preferred
Continue reading Refactoring Legacy Tests to JUnit 6 (Migration Playbook)

Writing Maintainable Tests in JUnit 6 (Clean Code Principles)

Test code is production code. It gets read, maintained, refactored, and extended over the lifetime of a project. A test suite that is hard to read becomes a liability — developers stop trusting it, stop running it, and eventually delete it. This guide applies Clean Code principles specifically to JUnit 6 test code, with before-and-after examples showing exactly what transforms a brittle, confusing test into a clear, maintainable specification.

The FIRST Principles of Good Tests

Good tests follow the FIRST acronym:

  • Fast — unit tests run in milliseconds; slow tests are skipped
  • Independent — each test sets up its own state; no shared mutable state between tests
  • Repeatable — same result every run, on any machine, in any order
  • Self-validating — pass or fail with no human interpretation required
  • Timely — written alongside or before the code they test, not weeks later

DRY vs DAMP: The Most Important Trade-off in Test Code

In production code, DRY (Don’t Repeat Yourself) is nearly always correct. In test code, the trade-off is different. DAMP (Descriptive And Meaningful Phrases) is sometimes better than DRY because tests need to be understandable in isolation:

// TOO DRY: setup extracted so aggressively that test is unreadable in isolation
@BeforeEach
void setUp() {
    // 40 lines of setup that 8 different tests depend on
    // Reader must scroll up to understand what ANY test is doing
}

@Test
void testScenarioA() {
    result = service.doThing(complexSharedObject);
    assertEquals("expected-A", result);
    // What is complexSharedObject? Requires scrolling. Confusing.
}

// DAMP: each test is self-contained and understandable alone
@Test
@DisplayName("Premium customer receives 20% loyalty discount")
void premiumCustomerReceivesTwentyPercentDiscount() {
    // Arrange: ALL context right here—no scrolling required
    Customer premiumCustomer = Customer.builder()
        .id(1L)
        .tier(CustomerTier.PREMIUM)
        .loyaltyPoints(5000)
        .build();
    Order order = new Order(null, premiumCustomer, 100.00);

    // Act
    double finalPrice = discountService.applyLoyaltyDiscount(order);

    // Assert
    assertEquals(80.00, finalPrice, 0.001,
        "Premium customers with 5000+ points get 20% off");
}
Continue reading Writing Maintainable Tests in JUnit 6 (Clean Code Principles)

Test Pyramid vs Test Trophy: What Actually Works in Production

The Test Pyramid has guided software testing strategy for over a decade. But in modern software — especially microservices, APIs, and React frontends — some teams find a different shape, the Test Trophy, better reflects where testing value actually lives. This guide explains both models honestly, examines where each works and fails, and gives you a practical framework for choosing the right mix for your specific project with JUnit 6.

The Test Pyramid

Mike Cohn introduced the Test Pyramid in 2009. The model has three layers:

The Pyramid’s core message: Write lots of fast unit tests, fewer integration tests, and very few E2E tests. This minimises test suite cost (time + maintenance) while maximising coverage.

The Test Trophy

Kent C. Dodds proposed the Test Trophy in 2018. Its shape places integration tests at the centre, with static analysis at the base:

The Trophy’s core message: Integration tests give you the best return on investment because they test the way your software actually works — multiple units collaborating — without the fragility of E2E tests.

Continue reading Test Pyramid vs Test Trophy: What Actually Works in Production

Unit vs Integration vs E2E Testing in JUnit 6 (Practical Guide)

Not all tests are equal. A unit test that runs in 5ms and a full end-to-end test that takes 3 minutes serve completely different purposes — and confusing the two leads to test suites that are either too slow to be useful or too shallow to catch real bugs. This guide gives you the precise definition, scope, tools, and trade-offs for each test type in JUnit 6, with production-grade examples that show exactly what belongs in each layer.

The Three Testing Layers

Unit TestIntegration TestE2E Test
What it testsOne class in isolationMultiple components togetherEntire system as a user would
DependenciesAll mockedSome real, some mockedAll real
Speed<10ms per test100ms – 10s per testSeconds to minutes
ReliabilityExtremely reliableUsually reliableCan be flaky (network, timing)
Scope of feedbackPinpoints exact linePoints to integration boundarySays “something is broken”
JUnit 6 setup@ExtendWith (MockitoExtension.class)@SpringBootTest, @DataJpaTest@SpringBootTest(RANDOM_PORT) + Docker

Layer 1: Unit Tests

A unit test verifies the behaviour of a single class — no database, no HTTP, no file system. All external dependencies are replaced with mocks or stubs. This makes unit tests the fastest, most reliable, and most informative tests you can write.

// UNIT TEST: Tests OrderService in complete isolation.
// No Spring context, no database, no HTTP — dependencies mocked.
@ExtendWith(MockitoExtension.class)
@DisplayName("OrderService — unit tests")
class OrderServiceUnitTest {

    @Mock private OrderRepository orderRepository; // mocked
    @Mock private PaymentGateway  paymentGateway;  // mocked
    @Mock private EmailService    emailService;    // mocked
    @InjectMocks private OrderService orderService; // real class under test

    @Test
    @Tag("unit")
    @DisplayName("Placing a valid order saves it and sends a confirmation email")
    void placingValidOrderSavesItAndSendsEmail() {
        // Arrange: define mock behaviour
        Order savedOrder = new Order(1L, "[email protected]", 49.99, OrderStatus.CONFIRMED);
        when(paymentGateway.authorise(anyDouble())).thenReturn("AUTH-001");
        when(orderRepository.save(any())).thenReturn(savedOrder);

        // Act
        Order result = orderService.place("[email protected]", 49.99);

        // Assert behaviour AND interactions
        assertEquals(OrderStatus.CONFIRMED, result.getStatus());
        verify(emailService, times(1)).sendConfirmation("[email protected]");
    }

    @Test
    @Tag("unit")
    @DisplayName("Payment gateway failure cancels order immediately")
    void paymentGatewayFailureCancelsOrder() {
        when(paymentGateway.authorise(anyDouble()))
            .thenThrow(new PaymentDeclinedException("Card declined"));

        assertThrows(PaymentDeclinedException.class,
            () -> orderService.place("[email protected]", 49.99));

        // Repository must NOT be called if payment fails
        verifyNoInteractions(orderRepository, emailService);
    }
}
Continue reading Unit vs Integration vs E2E Testing in JUnit 6 (Practical Guide)