
Bootstrapping Hibernate 7: SessionFactory vs EntityManagerFactory vs Spring Boot Auto-Config — A Decision Guide
Most Spring Boot developers would struggle to answer the question: which Hibernate bootstrap path are you actually using? The answer is “the one Spring Boot chose for you”, which is the EntityManagerFactory path, built by HibernateJpaAutoConfiguration, wired to a HikariDataSource, reading from application.properties. You have never typed a single line of Hibernate bootstrap code.

That is fine for the common case. But when something breaks at startup — the wrong dialect is selected, HikariCP sizing is wrong, the schema validation fails — you need to know what is actually being configured and where. And for projects outside Spring Boot (command-line tools, framework libraries, Jakarta EE deployments), you need to choose a bootstrap path and implement it deliberately.

This post covers all three paths, when each makes sense, and the production failure that catches developers who autoconfig their way to production without understanding what they built.

Continue reading Bootstrapping Hibernate 7: SessionFactory vs EntityManagerFactory vs Spring Boot Auto-Config — A Decision Guide

Hibernate 7 Hello World: A Working Project from Empty Folder to First Insert

Most Hibernate Hello World tutorials get you to a running INSERT in about 10 minutes. They also leave out three things that will bite you the moment you move past the trivial case.

First: the import packages. Hibernate 7 requires jakarta.persistence.*, not javax.persistence.*. Every tutorial written before 2022 uses the old namespace. If you copy the entity annotation from a pre-Hibernate 6 guide, the annotations will not be recognised and you will spend 30 minutes wondering why your table never appears.

Second: the persistence.xml location trap in Maven multi-module setups. The file belongs at src/main/resources/META-INF/persistence.xml in the module that contains your entity classes. Putting it in the wrong module produces a silent failure at bootstrap.

Third: the LazyInitializationException you will hit in your second example. The first example always works because you access everything inside one open session. The second example accesses an association after the session closes. This post calls that out explicitly so you see it coming.

Everything else is the standard step-by-step: Maven setup, entity, configuration, utility class, first insert. The code is complete and runs without modification on Java 17+.

Three Things This Guide Gets Right That Most Hello World Tutorials Skip

Hibernate 7 is not just a minor update; it’s optimized for modern environments like Jakarta EE 11 and Java 17/21/25+. It leverages the latest features of the JPA (Jakarta Persistence API) to provide a more type-safe and performant way to interact with your data.

High-Level Architecture Overview

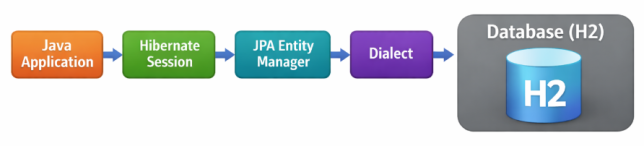
Understanding the flow of data is crucial for mastering any ORM. Here is the architectural stack for this tutorial:

Java ApplicationHibernate SessionJPA Entity ManagerDialectDatabase (H2/MySQL)

Continue reading Hibernate 7 Hello World: A Working Project from Empty Folder to First Insert

15 Common Problems During JUnit 5 to JUnit 6 Upgrade (And Proven Fixes to Get You Back on Track)

Upgrading your Java testing suite from JUnit 5 to JUnit 6? It’s a smart move—JUnit 6 brings a Java 17 baseline, cleaner APIs, unified versioning, and enhancements like improved CSV parsing with FastCSV. Released on September 30, 2025, this major update streamlines testing for modern Java projects, but it’s not without hurdles. If you’re searching for “JUnit 6 migration issues” or “breaking changes JUnit 5 to 6,” you’re in the right place.

As a seasoned Java developer who’s guided dozens of teams through framework upgrades, I’ve seen these pain points firsthand. In this post, we’ll dive into 15 common problems developers encounter during the JUnit 6 upgrade, complete with real-world explanations, code snippets, and step-by-step solutions. Whether you’re dealing with dependency clashes or sneaky API removals, these fixes will minimize downtime and keep your CI/CD pipeline humming.

By the end, you’ll have a migration checklist to tackle the upgrade confidently. Let’s jump in—your tests (and sanity) will thank you.


Why Upgrade to JUnit 6 Now?

Before we hit the issues, a quick note: JUnit 6 isn’t just a version bump. It mandates Java 17+ for better performance and security, deprecates legacy cruft, and aligns with Kotlin 2.2. Most JUnit 5 tests run unchanged, but ignoring these changes could lead to cryptic build failures. Pro tip: Start with a feature branch and use tools like OpenRewrite for automated refactors.

Continue reading 15 Common Problems During JUnit 5 to JUnit 6 Upgrade (And Proven Fixes to Get You Back on Track)

JUnit 6 Deep Dive: What’s New, What Changed, and How to Migrate

Eight years after JUnit 5 shipped, the framework has a new major version. JUnit 6.0.0 released on September 30, 2025 — and unlike the painful JUnit 4 → 5 migration that rewrote the annotation model from scratch, this one is designed to be a calm, deliberate step forward. The current stable release is 6.1.1 (June 28, 2026).

JUnit 6 is not a revolution. It’s a maturation: a Java 17 baseline, unified versioning, first-class Kotlin coroutine support, null-safety annotations across the entire API, and a proper cancellation model for CI pipelines. If you’re already on JUnit 5.14 and Java 17+, the migration is mostly a version bump in your pom.xml. This guide covers what changed, what broke, and what the upgrade looks like in practice.

Continue reading JUnit 6 Deep Dive: What’s New, What Changed, and How to Migrate

Master JUnit 5: A Deep Dive into @TestInstance, @TestMethodOrder, and @Timeout

If your JUnit tests rely on clumsy static setup, break the moment they are reordered, or occasionally freeze your CI/CD pipeline, you are likely fighting the default test engine.

JUnit 5 (Jupiter) introduced a suite of powerful annotations to solve these exact architectural bottlenecks. In this guide, we’ll explore three game-changers: @TestInstance, @TestMethodOrder, and @Timeout, and how to use them to build a professional-grade, enterprise-ready automation framework.


1. @TestInstance: Redefining the Test Lifecycle

By default, JUnit creates a new instance of your test class for every single @Test method. This is known as Lifecycle.PER_METHOD. While this ensures perfect test isolation, it forces one major constraint: @BeforeAll and @AfterAll methods must be static.

The Problem: Static Constraints and Overhead

In a standard lifecycle, you are restricted to static fields for global setup. This becomes a headache when using Dependency Injection (like Spring’s @Autowired) or when your setup logic requires access to instance-level variables. Furthermore, if your test class has a heavy constructor or deep initialization, recreating it dozens of times for every test significantly slows down your build speed.

Continue reading Master JUnit 5: A Deep Dive into @TestInstance, @TestMethodOrder, and @Timeout

Master JUnit 5 @RegisterExtension: The Power of Programmatic Extensions

TL;DR: Use @RegisterExtension when your JUnit 5 extension needs runtime configuration, state access, or dynamic initialization—especially in integration tests.

Testing in Java has evolved far beyond simple assertions. As developers, we often face scenarios where standard declarative testing doesn’t cut it. You might need to initialize a database with a dynamic port, configure a web server based on specific test parameters, or inject dependencies that are only known at runtime.

This is where JUnit 5 @RegisterExtension shines. In this guide, we’ll explore how to move beyond the static @ExtendWith annotation and embrace the flexibility of programmatic extension registration.

What is @RegisterExtension?

In JUnit 5, extensions allow you to hook into the test lifecycle (before all, before each, after each, etc.). While @ExtendWith is the standard way to register these extensions declaratively, @RegisterExtension allows you to register them programmatically via fields in your test class.

Why use @RegisterExtension over @ExtendWith?

The primary advantage is initialization flexibility. Because you are declaring the extension as a field, you can:

Continue reading Master JUnit 5 @RegisterExtension: The Power of Programmatic Extensions

Mastering JUnit 5 @ExtendWith: The Ultimate Guide to the Jupiter Extension Model

In the evolution of Java testing, the transition from JUnit 4 to JUnit 5 (Jupiter) wasn’t just a version bump—it was a complete architectural overhaul. One of the most significant changes was the retirement of the rigid Runner and Rule API in favor of a flexible, modular Extension Model.

At the heart of this model lies the @ExtendWith annotation. In this comprehensive guide, we will explore why @ExtendWith is a gateway into a sophisticated ecosystem that boosts developer productivity, how to use it with industry-standard libraries like Mockito, and how to build your own custom extensions to automate repetitive testing logic.

What is JUnit 5 @ExtendWith?

In JUnit 5, the @ExtendWith annotation is the primary way to register one or more Extensions for a test class or a specific test method.

Think of an extension as a “plugin” for your tests. Instead of JUnit being a closed system, it provides Extension Points—specific moments in the test lifecycle (like before a test starts, after it fails, or when a parameter needs to be resolved). The @ExtendWith annotation tells JUnit: “Hey, use this specific class to intercept these lifecycle events for me.”

Continue reading Mastering JUnit 5 @ExtendWith: The Ultimate Guide to the Jupiter Extension Model