
Imagine you’re building a complex user interface. You have a dozen different components: buttons, text fields, checkboxes, and dropdowns. A change in one component needs to affect several others. For example, selecting an option in a dropdown might enable a specific button, disable a checkbox, and populate a text field.
If you make these components talk directly to each other, you’ll quickly end up with a tangled mess. Each component will need a direct reference to every other component it interacts with. This is what we call “spaghetti code”—a nightmare to debug, maintain, and extend. Every time you add a new component, you have to go back and wire it up to all the existing ones.
So, how do we clean up this mess? Enter the Mediator Pattern.
The Mediator Pattern is a behavioral design pattern that provides a centralized communication hub for a group of objects. Instead of talking to each other directly, these objects (called Colleagues) only talk to the central hub (the Mediator). The Mediator then relays messages and coordinates actions between the Colleagues.
The classic real-world analogy is an Air Traffic Control (ATC) tower. Airplanes don’t communicate directly with each other to coordinate landings and takeoffs. That would be chaotic and dangerous. Instead, every airplane communicates with the central control tower, and the tower directs all the planes, ensuring they operate safely without knowing about each other’s flight plans.
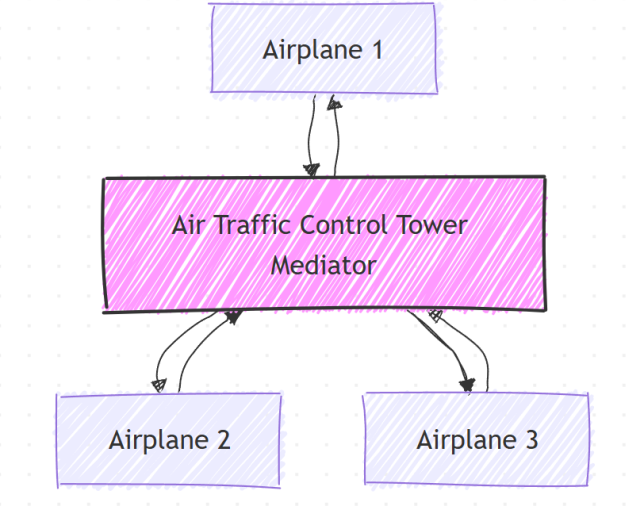
The Key Players in the Mediator Pattern
To understand how it works, let’s break down the main components:
- Mediator (The Interface): This is an interface that defines the communication contract. It typically declares a method for Colleagues to use when they need to send a message or notify the Mediator of a change.
- ConcreteMediator (The Implementation): This is the class that implements the Mediator interface. It knows about all the Colleagues and holds the actual logic for coordinating their interactions. It maintains a list of Colleagues and decides who to notify when an event occurs.
- Colleague (The Component): These are the individual objects that need to communicate. Each Colleague holds a reference to the Mediator object but has no knowledge of the other Colleagues.
A Practical Example: Building a Chat Room
A chat room is a perfect example to illustrate the Mediator Pattern. In a chat room, multiple users can send messages. When one user sends a message, it should be broadcast to all other users in the room. Without a mediator, each user object would need to hold a reference to every other user object, which is not scalable.
Let’s build a simple chat application using the Mediator Pattern.
Step 1: Define the Mediator Interface and Colleague Class
First, we need a contract for our chat mediator and a class to represent our users. The User will be our Colleague.
Notice that the User class is abstract. It has a reference to the ChatMediator and methods to send() and receive() messages. The key here is that a User doesn’t know about other Users; it only knows about the mediator.
// The Mediator Interface
public interface ChatMediator {
    void sendMessage(String msg, User user);
    void addUser(User user);
}

// The Colleague
public abstract class User {
    protected ChatMediator mediator;
    protected String name;

    public User(ChatMediator med, String name){
        this.mediator = med;
        this.name = name;
    }

    public abstract void send(String msg);
    public abstract void receive(String msg);
}
Step 2: Create the Concrete Implementations
Now, let’s create the concrete classes that will do the actual work.
ChatMediatorImpl will be our ConcreteMediator. It maintains a list of all users. When a user sends a message, the mediator receives it and broadcasts it to every other user in the list.
UserImpl will be our ConcreteColleague. It simply calls the mediator’s sendMessage() method when it wants to send a message.
import java.util.ArrayList;
import java.util.List;

// The Concrete Mediator
public class ChatMediatorImpl implements ChatMediator {
    private List users;

    public ChatMediatorImpl(){
        this.users = new ArrayList<>();
    }

    @Override
    public void addUser(User user){
        this.users.add(user);
    }

    @Override
    public void sendMessage(String msg, User user) {
        // Message is sent to all users except the sender
        for(User u : this.users){
            if(u != user){
                u.receive(msg);
            }
        }
    }
}

// The Concrete Colleague
public class UserImpl extends User {

    public UserImpl(ChatMediator med, String name) {
        super(med, name);
    }

    @Override
    public void send(String msg){
        System.out.println(this.name + ": Sending Message = " + msg);
        mediator.sendMessage(msg, this);
    }

    @Override
    public void receive(String msg) {
        System.out.println(this.name + ": Received Message: " + msg);
    }
}
Step 3: Putting It All Together
Finally, let’s create a client to test our chat room. We’ll create a mediator, create a few users, and add them to the mediator. Then, we’ll have one user send a message and see how the mediator handles the communication.
public class ChatClient {
    public static void main(String[] args) {
        // 1. Create the Mediator
        ChatMediator mediator = new ChatMediatorImpl();

        // 2. Create the Colleagues (Users)
        User user1 = new UserImpl(mediator, "Ankur");
        User user2 = new UserImpl(mediator, "Brian");
        User user3 = new UserImpl(mediator, "Catherine");
        User user4 = new UserImpl(mediator, "David");

        // 3. Add users to the Mediator's list
        mediator.addUser(user1);
        mediator.addUser(user2);
        mediator.addUser(user3);
        mediator.addUser(user4);

        // 4. A user sends a message, and the mediator broadcasts it
        user1.send("Hi everyone!");
    }
}
Output:
Ankur: Sending Message = Hi everyone!
Brian: Received Message: Hi everyone!
Catherine: Received Message: Hi everyone!
David: Received Message: Hi everyone!
As you can see, Ankur sent a message only to the mediator. The mediator then took care of delivering that message to Brian, Catherine, and David. Ankur didn’t need to know anything about them, and they didn’t need to know about each other. Communication is perfectly decoupled!
Why Use the Mediator Pattern? (Pros)
- Reduces Coupling: This is the biggest benefit. Colleagues are no longer tightly coupled to each other. You can change one Colleague without affecting the others.
- Centralizes Control: The interaction logic, which was once scattered across all the Colleague classes, is now in one place: the Mediator. This makes the logic easier to understand, maintain, and evolve.
- Encourages Reusability: Since Colleagues are independent and don’t rely on other concrete Colleagues, they become much easier to reuse in different contexts with a different Mediator.
- Simplifies Many-to-Many Relationships: It turns a chaotic web of many-to-many communications into a much simpler set of one-to-many relationships between the Mediator and its Colleagues.
What Are the Downsides? (Cons)
The Mediator Pattern is powerful, but it’s not a silver bullet. It has one major drawback:
- The God Object Mediator: The Mediator can become a “God Object”—a single, monolithic class that handles all the logic for a large number of Colleagues. A very complex mediator can become difficult to maintain, violating the single responsibility principle. It’s important to keep your mediators focused on a specific, well-defined purpose.
When Should You Reach for the Mediator?
Use the Mediator Pattern when:
- A set of objects communicates in a well-defined but complex way, creating a web of dependencies.
- You want to reuse an object, but its heavy dependence on other objects makes it difficult.
- You need to be able to change the communication logic between objects without having to recompile the objects themselves.
Conclusion
The Mediator Pattern is an excellent tool for simplifying complex communication logic and decoupling objects within a system. By introducing a central coordinator, you can replace a tangled web of interactions with a clean, hub-and-spoke model. This leads to code that is more maintainable, flexible, and easier to understand. The next time you find your objects becoming too chatty with each other, consider appointing a mediator to bring some order to the chaos.
No Comments yet!