Note: I wrote this in 2013, before Chrome locked extension installs down to the Web Store only. The direct .crx download/sideload approach described below — including my own custom theme file — won’t install on Chrome today. Keeping this post up as a historical snapshot.
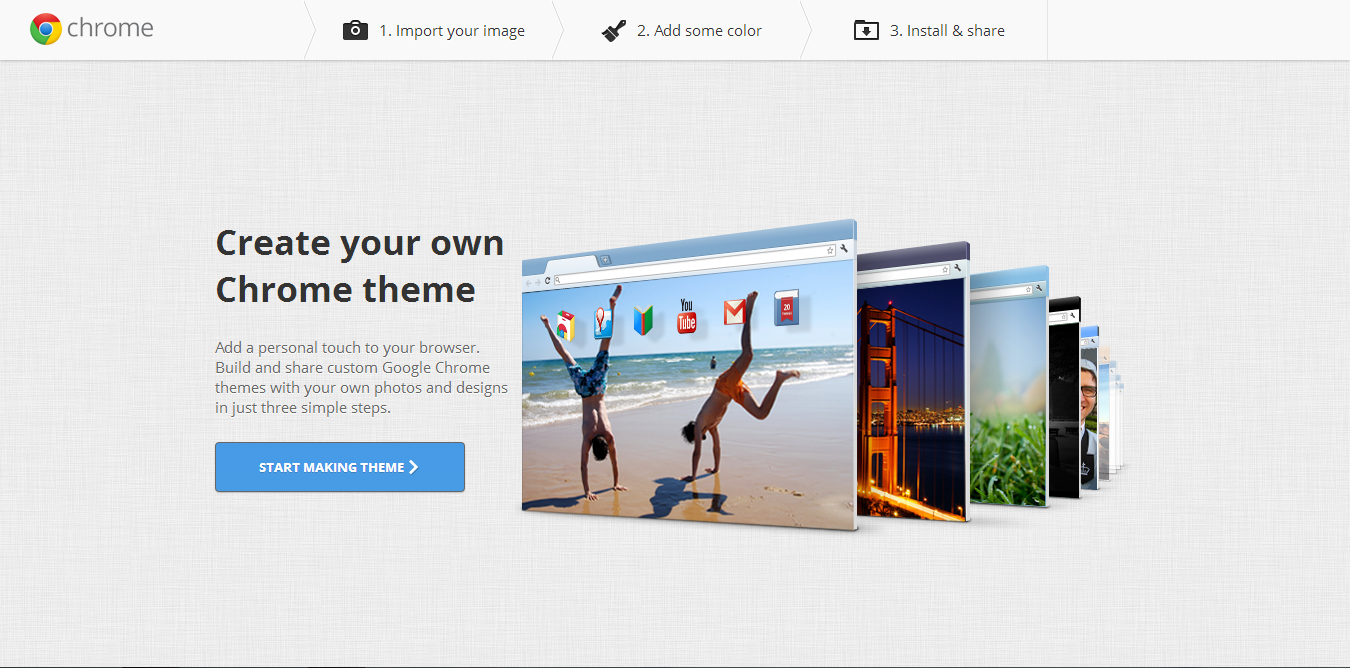
Of-course for most of you Google Chrome is just like a friend on internet. As you know, you can customize Google Chrome by adding several addons and themes from Chrome Web Store or form internet. Ya! those addons and themes are not customizable. Somebody has built it and you are consuming it. It may happen that, you may fall in love with a theme, but sometimes since it is your bad luck, when you download that theme, you find that it not having proper resolution! So here is one best option for you, Create your own theme.
Each one thinks in different way. Hence choices are different. Accounting such requirements of Google Chrome users, Google have developed an extension to create your own themes. You can navigate to Chrome Web Store and look for “My Chrome Theme” or else you can simply click here. You might need to sign in to Chrome Web Store to add this extension to your browser.
Getting Started
Create Your Own Theme:Chrome (Introduction)
Creating themes with My Chrome Theme is quite easy. You just have to launch the app & click on “Start Making New Theme”.
Note: I wrote this in 2013 about a browser extension that added a site-switcher button to Google’s homepage. The extension is long gone from the Chrome Web Store and Google’s homepage has changed since, so this isn’t actionable today. Keeping this post up for the record.
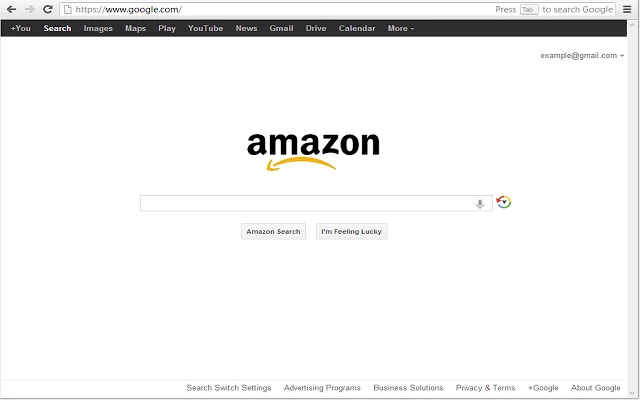
In your life, Google might be one of your best friend on internet. Whenever you need any information, Google is always there for you. You just navigate to www.google.com, enters a query and Google displays you a huge list of result. This list contains results for all websites, you can say nearly all those which are present on internet. But sometimes it may happen that you might want a result from some specific website, say a video from YouTube or you can say an article from Wikipedia. How to do that? Ya! There are few search operators but let’s take help of a great extension Search Switch.
Search Switch is available for both Chrome and Firefox (You can find download link at end of this post). Just you have to navigate to site, and Download. Once Search Switch is installed on your favorite browser, you have to navigate to www.google.com and you will find a refresh (somewhat like that) button at right side of Google Search box. Just click on that button and select the site on which you want to search. The default Google logo will get replaced and ‘Google Search” button will change as soon as you select the site from list. Now, just enter your query and hit Search button. That’s all. Search Switch will take you on respective site and will show result for your query.
Search Switch in action
You can use up/down arrow keys or mouse scroll to switch between sites. Apart from that, Search Switch provides few shortcut keys to switch between the websites. You can get complete list of keys in setting menu of Search Switch (which is located on footer of google.com whenever Search Switch is enable) or at their website. Search Switch supports Amazon, eBay, Wikipedia, Twitter, YouTube, Pinterest, Facebook, Weather.com, WebMD, IMDb, your Gmail Inbox, eHow, Yelp, and RetailMeNot. Here is a small video on how Search Switch works.
If you are a Google Chrome user, then you can get Search Switch from Chrome Web Store. But if you are a Mozilla Firefox user then you have to download it from official website of Search Switch. When we tested Search Switch, we found that Search Switch works only with www.google.com and not with region specific versions of Google.
Note: I wrote this guide in 2012. While the concept of resource hints is still very important, the specific prerender standard and browser implementations have evolved significantly since then. Modern best practices often rely on prefetch or preload instead.
While exploring the latest web technologies, I came across a fantastic tool for web designers. You might already know that Google Chrome has an option to enable Network Prediction. Google built this feature to dramatically decrease page load times by fetching resources in the background, so when a user clicks a link, the page loads almost instantly. This feature is often referred to as “Instant Pages.”
Here’s a quick video from Google explaining how prerendering works:
Prerendering is an experimental feature in Chrome (versions 13 and up) that can take hints from a site’s author to speed up the browsing experience of users. A site author includes an element in HTML that instructs Chrome to fetch and render an additional page in advance of the user actually clicking on it.
Note: I originally wrote this back in 2012. While Page Snooze was a cool concept at the time, browser capabilities and available extensions have changed a lot since then!
If you’re a hardcore web surfer, you’ve probably run into this problem: you’ve got dozens of tabs open across your screen, and you don’t even know which one to look at next. All those open tabs chew up your system’s memory, which inevitably leads to a browser crash. And if you run into a system fault, a blue screen, or a power outage, you risk losing all of them. Or, more simply, you just don’t have the time to read through all that content right now. Even if your browser doesn’t crash, the sheer clutter of that many tabs is pretty irritating.
If you’re using Google Chrome, I found a neat little extension that helps solve this called Page Snooze.
So, What Does Page Snooze Actually Do?
It’s a pretty clever concept. Page Snooze takes a tab and hides it away for a specific amount of time. Once that timer runs out, the tab automatically reopens in your browser window, right when you’re ready to deal with it.
You can grab the extension directly from the Chrome Web Store: Download Page Snooze
Once you’ve installed it, you’ll notice a new clock icon sitting right next to your address bar.
Page Snooze In Action
Using it is super intuitive.
Just right-click anywhere on the page you want to hide, and you’ll see a new “Page Snooze” option in the context menu. Select how long you want to snooze it for, and poof—the tab vanishes. It’ll automatically spring back to life when the time is up.
Note: I originally wrote this post way back in 2012. While the Google Input Tools extension is still around, some of the interfaces, screenshots, and exact features might have changed. Keep that in mind as you read through!
Have you ever needed to quickly type something in your native language, but didn’t want the hassle of installing a full OS-level keyboard? That’s where the Google Input Tools Chrome extension comes in. It lets you type in your preferred language directly into any text box on almost any website. You get transliteration, virtual keyboards, and IMEs all packaged into your browser. It supports every transliteration method from the Google Transliteration Service and over 90 keyboard layouts from Google Virtual Keyboard.
How To Get Started
First things first, grab the extension from the Chrome Web Store.
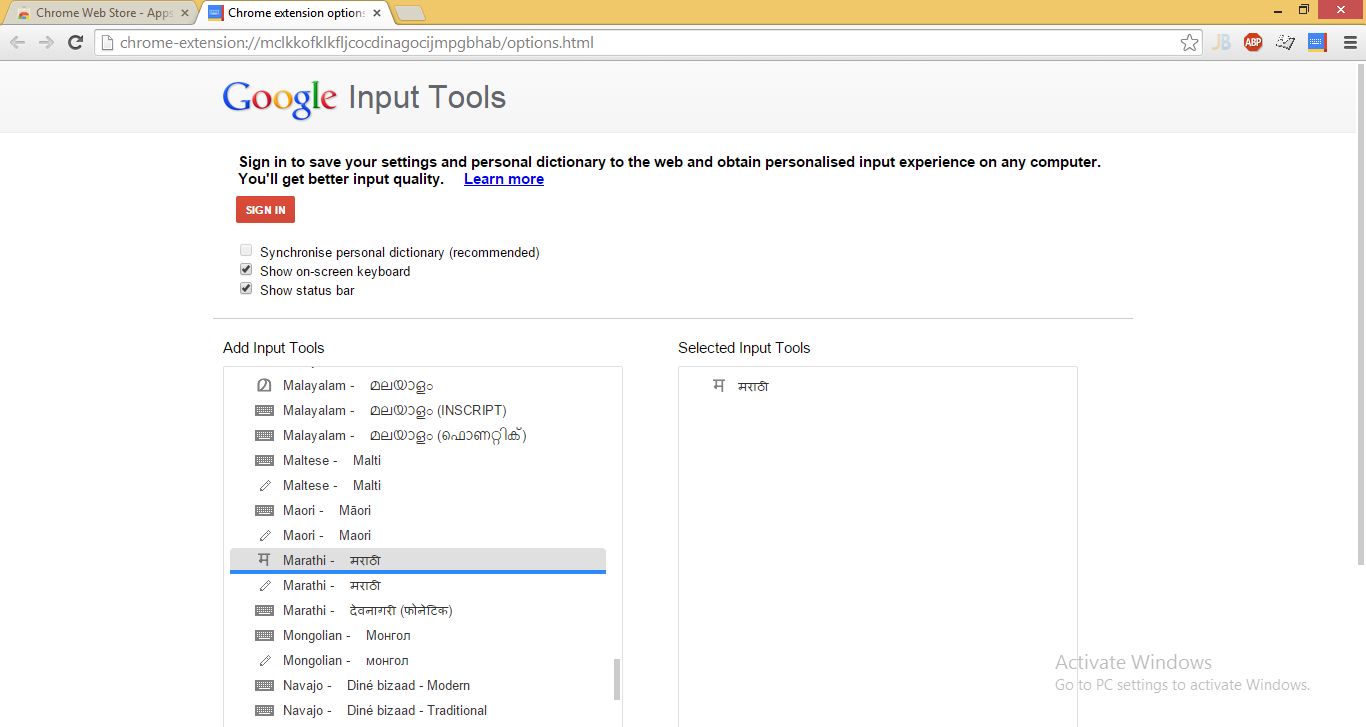
When you install it for the first time, it’ll ask you to pick your input methods. Just click the extension icon and select “Extension Options” from the pop-up. A new tab opens up where you can pick exactly what you need. Don’t worry if you miss something—you can always come back to this page to add, remove, or rearrange your tools.
For example, here’s a screenshot showing how I added Marathi to my input tools.