
The Flood Fill Algorithm fills a connected region on a raster display by replacing all pixels that share the same original colour as the seed pixel with a new fill colour. Unlike the Boundary Fill Algorithm — which stops at a specific boundary colour — Flood Fill continues spreading in all directions as long as the pixel matches the original seed colour. It is the underlying technique used by the “Paint Bucket” tool in image editors.
#include<iostream.h>  // Standard input-output stream
#include<conio.h>      // Console input-output (getch)
#include<graphics.h>   // Turbo C++ graphics library
#include<dos.h>        // DOS-specific functions

// Recursively fills all pixels matching originalColour with newFillColour
// Uses 8-connected filling: checks all 8 neighbours of each pixel
void floodFill(int pixelX, int pixelY, int originalColour, int newFillColour)
{
    // Stop if current pixel does not match the original seed colour
    if (getpixel(pixelX, pixelY) == originalColour)
    {
        putpixel(pixelX, pixelY, newFillColour); // Colour this pixel

        // Recursively flood-fill all 8 neighbouring pixels
        floodFill(pixelX + 1, pixelY,     originalColour, newFillColour); // Right
        floodFill(pixelX,     pixelY + 1, originalColour, newFillColour); // Down
        floodFill(pixelX,     pixelY - 1, originalColour, newFillColour); // Up
        floodFill(pixelX - 1, pixelY,     originalColour, newFillColour); // Left
        floodFill(pixelX + 1, pixelY + 1, originalColour, newFillColour); // Down-Right
        floodFill(pixelX - 1, pixelY - 1, originalColour, newFillColour); // Up-Left
        floodFill(pixelX - 1, pixelY + 1, originalColour, newFillColour); // Down-Left
        floodFill(pixelX + 1, pixelY - 1, originalColour, newFillColour); // Up-Right
    }
}

void main()
{
    int graphicsDriver = DETECT, graphicsMode; // Auto-detect graphics driver
    initgraph(&graphicsDriver, &graphicsMode, "C:\\tc\\bgi"); // Initialise graphics mode

    // Draw a rectangle to act as the region boundary
    rectangle(50, 50, 100, 100);

    // Seed point (55,55) is inside the rectangle
    // originalColour = 0 (black background colour inside the rectangle)
    // newFillColour  = 3 (cyan)
    floodFill(55, 55, 0, 3);

    getch();       // Wait for a key press
    closegraph();  // Close the graphics window
}
How the Code Works
- Graphics initialisation –
initgraph()starts the Borland Graphics Interface (BGI).DETECTautomatically selects the appropriate graphics driver. - Drawing the region –
rectangle(50, 50, 100, 100)draws a 50×50 square. The interior pixels remain black (colour 0), which serves as theoriginalColourfor the flood fill. - Seed point – The seed coordinate
(55, 55)is a pixel inside the rectangle. The algorithm starts here and fans out to all connected pixels of the same colour. - Base case – Inside
floodFill(),getpixel()reads the colour of the current pixel. If it does not matchoriginalColour, the function returns immediately — this stops the fill at the rectangle’s white border and at any already-filled pixel. - Recursive colouring – When the current pixel matches
originalColour,putpixel()paints itnewFillColour(3 = cyan), and the function recursively visits all 8 neighbours. Colouring the pixel before recursing prevents infinite loops. - Flood Fill vs. Boundary Fill – Flood Fill checks for a matching source colour; Boundary Fill checks for a boundary colour. The result is the same for solid-bordered shapes, but their stopping conditions differ fundamentally.
Output
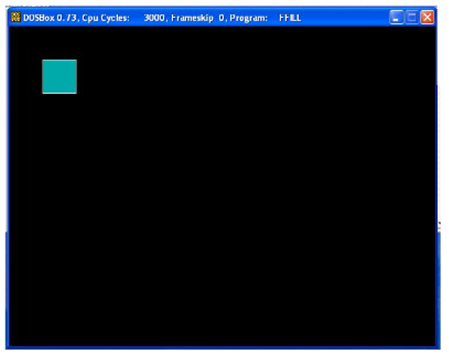
Output Explanation
The screenshot shows the rectangle drawn on the graphics screen with its interior completely filled with cyan (colour 3). The white border of the rectangle stops the fill because those pixels do not match the original black background colour. All interior pixels — including diagonally connected ones — have been painted, demonstrating the 8-connected nature of the algorithm.
See Also
- Implementing Boundary Fill Algorithm in C++
- Implementing Bresenham’s Line Algorithm in C++
- C++ Program to Implement DDA Line Drawing Algorithm
- Implementing Bresenham’s Circle Drawing Algorithm in C++
Conclusion
The Flood Fill Algorithm is a powerful and easy-to-understand region-filling technique. Its recursive, 8-connected implementation ensures complete coverage of any closed region without leaving diagonal gaps. In practice, large regions can cause stack overflows with naive recursion, so production systems replace the call stack with an explicit queue or stack data structure. Understanding Flood Fill is essential for anyone studying computer graphics, game development, or image processing.
No Comments yet!