In this tutorial we will be exploring Spring Cloud Feign component.
What is Feign?
Feign is a declarative REST Client. With the help of Feign, you can declare web services as interfaces in your application. And you can simply use those interfaces to consume those web services. While runtime Feign will provide actual REST API implementation.
TL;DR You can download whole project by clicking following link.
To give you a brief idea… In this tutorial, we will be consuming web service using Feign.
Producer Service
We will need something to consume. So we will first have producer service first. We will be using producer service created in the previous tutorial. You can refer How to develop a eureka client application post.
We will need to make some changes in application.properties of the producer. We will add ‘server.port’ property since we will be using it in our consumer.
spring.application.name=StudentProducer
eureka.client.serviceUrl.defaultZone=http://localhost:11800/eureka
eureka.instance.instanceId=:
server.port=11801
TL;DR you can download producer project by clicking on following link.
Consumer Service (Feign)
Let’s create a consumer service with Feign component.
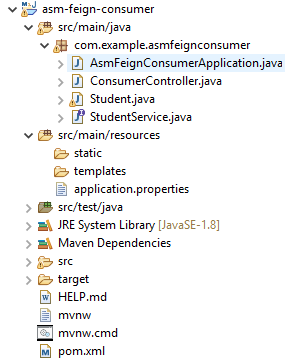
This will be a Maven Project. Our project structure is given below. We will be creating five files which are as follows:
- AsmFeignConsumerApplication.java – Spring boot run–able file
- Student.java – Our POJO/model
- StudentService.java – Service interface created using Feign
- ConsumerController.java – Rest controller
- application.properties – Spring properties file

Adding Dependencies
Let’s add the required dependencies. Replace content in pom.xml file with the following content. Don’t forget to update the project using Maven > Update option. That will download all the necessary dependencies.
<?xml version="1.0" encoding="UTF-8"?>
<project xmlns="http://maven.apache.org/POM/4.0.0"
	xmlns:xsi="http://www.w3.org/2001/XMLSchema-instance"
	xsi:schemaLocation="http://maven.apache.org/POM/4.0.0 https://maven.apache.org/xsd/maven-4.0.0.xsd">
	<modelVersion>4.0.0</modelVersion>
	<parent>
		<groupId>org.springframework.boot</groupId>
		<artifactId>spring-boot-starter-parent</artifactId>
		<version>2.3.1.RELEASE</version>
		<relativePath /> <!-- lookup parent from repository -->
	</parent>
	<groupId>com.example</groupId>
	<artifactId>asm-feign-consumer</artifactId>
	<version>0.0.1-SNAPSHOT</version>
	<name>asm-feign-consumer</name>
	<description>asmfeignconsumer</description>

	<properties>
		<java.version>1.8</java.version>
		<spring-cloud.version>Hoxton.SR6</spring-cloud.version>
		<maven-jar-plugin.version>3.1.1</maven-jar-plugin.version>
	</properties>

	<dependencies>
		<dependency>
			<groupId>org.springframework.boot</groupId>
			<artifactId>spring-boot-starter-web</artifactId>
		</dependency>
		<dependency>
			<groupId>org.springframework.cloud</groupId>
			<artifactId>spring-cloud-starter-netflix-eureka-client</artifactId>
		</dependency>

		<dependency>
			<groupId>org.springframework.cloud</groupId>
			<artifactId>spring-cloud-starter-openfeign</artifactId>
		</dependency>

		<dependency>
			<groupId>org.springframework.boot</groupId>
			<artifactId>spring-boot-starter-test</artifactId>
			<scope>test</scope>
			<exclusions>
				<exclusion>
					<groupId>org.junit.vintage</groupId>
					<artifactId>junit-vintage-engine</artifactId>
				</exclusion>
			</exclusions>
		</dependency>
	</dependencies>

	<dependencyManagement>
		<dependencies>
			<dependency>
				<groupId>org.springframework.cloud</groupId>
				<artifactId>spring-cloud-dependencies</artifactId>
				<version>${spring-cloud.version}</version>
				<type>pom</type>
				<scope>import</scope>
			</dependency>
		</dependencies>
	</dependencyManagement>

	<build>
		<plugins>
			<plugin>
				<groupId>org.springframework.boot</groupId>
				<artifactId>spring-boot-maven-plugin</artifactId>
			</plugin>
		</plugins>
	</build>

</project>
If you have noticed, we have added ‘spring-cloud-starter-openfeign’. That is the required dependency.
Creating Spring Boot Application
Create file AsmFeignConsumerApplication.java and add the following content. This file will serve as the entry point for our application.
package com.example.asmfeignconsumer;

import org.springframework.boot.SpringApplication;
import org.springframework.boot.autoconfigure.SpringBootApplication;
import org.springframework.cloud.openfeign.EnableFeignClients;

@SpringBootApplication
@EnableFeignClients
public class AsmFeignConsumerApplication {

	public static void main(String[] args) {
		SpringApplication.run(AsmFeignConsumerApplication.class, args);
	}

}
We have added @EnableFeignClients annotation here. It will denote that this spring boot app is a Feign client.
Creating model
Create class Student.java. This will be our POJO/model class. It has only 3 attributes viz, id, name and enrolled course.
package com.example.asmproducer;

import java.io.Serializable;

public class Student implements Serializable {

	private int id;

	private String name;

	private String enrolledCourse;

	public Student() {
		super();
	}

	public Student(int id, String name, String enrolledCourse) {
		super();
		this.id = id;
		this.name = name;
		this.enrolledCourse = enrolledCourse;
	}

	public int getId() {
		return id;
	}

	public void setId(int id) {
		this.id = id;
	}

	public String getName() {
		return name;
	}

	public void setName(String name) {
		this.name = name;
	}

	public String getEnrolledCourse() {
		return enrolledCourse;
	}

	public void setEnrolledCourse(String enrolledCourse) {
		this.enrolledCourse = enrolledCourse;
	}

}
Creating Feign Service Interface
Create an interface StudentService.java and paste following code. Here we will be specifying the URL of our producer service. We will be creating abstract methods as well with @RequestMapping annotations with method and value attribute same as what we specified in our producer service (or the service which we want to consume).
package com.example.asmfeignconsumer;

import java.util.List;

import org.springframework.cloud.openfeign.FeignClient;
import org.springframework.web.bind.annotation.PathVariable;
import org.springframework.web.bind.annotation.RequestMapping;
import org.springframework.web.bind.annotation.RequestMethod;

@FeignClient(name = "StudentProducer", url="http://localhost:11801")
public interface StudentService {

	@RequestMapping(method = RequestMethod.GET, value = "/student/{studentId}")
	public Student getStudent(@PathVariable int studentId);

	@RequestMapping(method = RequestMethod.GET, value = "/student/all")
	public List<Student> getAllStudents();

}
Here if you have noticed, we have used @FeignClient annotation and we have specified “http://localhost:11801” as URL. This is where the producer service is running. Another thing if you have noticed, we have added @RequestMapping annotations with the same method and value attributes as of those in producer service. This annotation will create a mapping between those URLs.
Creating Controller
Create class ConsumerController.java and add the following content. This will be our rest controller and will have endpoint related stuff.
package com.example.asmfeignconsumer;

import java.util.List;

import org.springframework.beans.factory.annotation.Autowired;
import org.springframework.web.bind.annotation.GetMapping;
import org.springframework.web.bind.annotation.PathVariable;
import org.springframework.web.bind.annotation.RestController;

@RestController
public class ConsumerController {

	@Autowired
	private StudentService studentService;

	@GetMapping("/studentdetails/all")
	public List<Student> getAllStudents() {
		return studentService.getAllStudents();
	}

	@GetMapping("/studentdetails/{studentId}")
	public Student getStudent(@PathVariable int studentId) {
		return studentService.getStudent(studentId);
	}

}
In this case, we have auto-wired our interface and directly invoked its methods in our controller.
Adding Properties
Under Resources folder create a file with name application.properties and add the following content.
spring.application.name=StudentConsumer2
eureka.client.serviceUrl.defaultZone=http://localhost:11800/eureka
server.port=11803
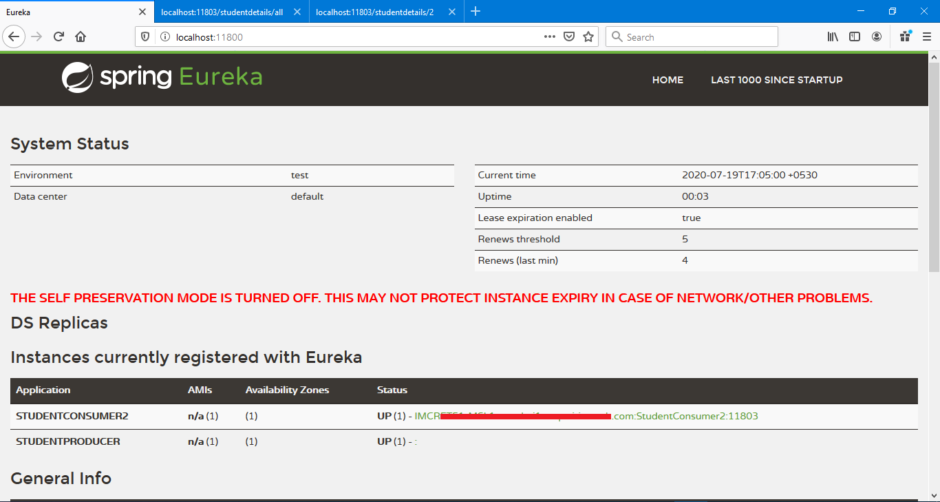
Now start both producer and consumer applications. Since both of our applications are Eureka Clients, you should able to see them in Eureka dashboard.

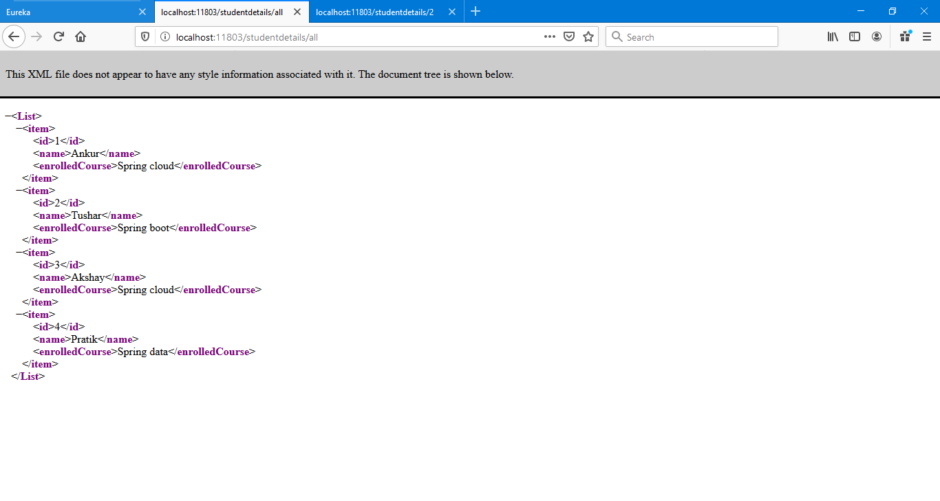
Let’s see if we can access our service or not. For that, you will need to navigate to ‘http://localhost:11802/studentdetails/all’ URL. You should see some result as shown in below screenshot.

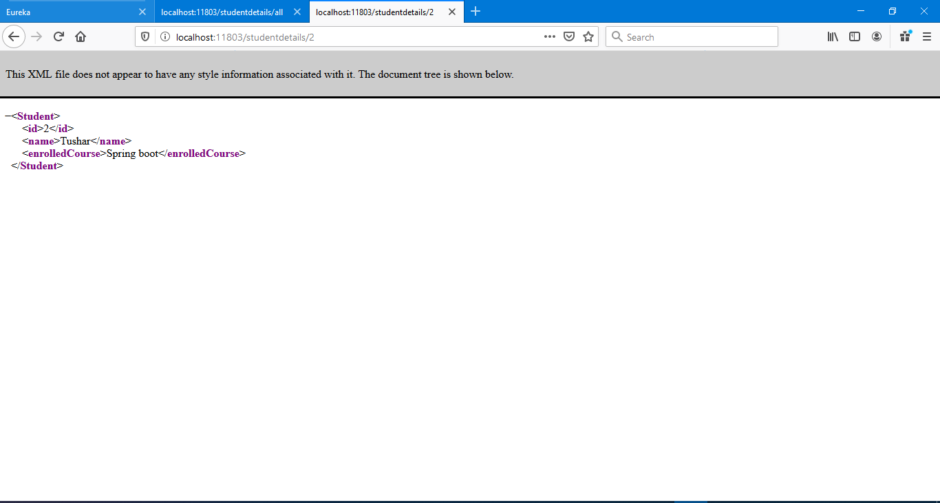
If you navigate to ‘http://localhost:11802/studentdetails/2’ URL, you should see some result as shown in below screenshot.

Downloads for this tutorial:
Reference:
- Spring Cloud- Netflix Feign Simple Example by JavaInUse
